

With the introduction of new Windows 10 service branches, you will need to upgrade your Windows 10 devices at a much faster pace. Hopefully, SCCM Current Branch (1511 and higher) has built-in features to help you fulfill this task. You can choose between Upgrade Task Sequence or the new Windows Servicing feature. This post will describe how to use SCCM Windows 10 servicing plans to upgrade Windows 10 devices.
If you are running SCCM 1511 we recommend using the Upgrade Task Sequence over servicing plans. SCCM 1511 has an issue that makes all Windows 10 languages and editions to be downloaded to the device when the ADR runs. This is fixed in SCCM 1602, using a new filter you can exclude unwanted languages and editions.
If you are running SCCM 1602 or later, it’s really a matter of preference of which process to use. Each one has their own advantages, the new servicing features is using the ADR/Software Update engine, the Task Sequence one is using Task Sequence engine. The Task Sequence method allows to run additional tasks after the upgrade or install new applications. Read both our post before making your decision or use both if needed.
In this post, we will be upgrading a Windows 10 1511 to Windows 10 1607 using SCCM 1606 serving plans. You can use this method to upgrade any upcoming Windows 10 release. You can’t use servicing plans to upgrade Windows 7 or Windows 8 computers.
SCCM Windows 10 Servicing Plans Requirements
Before using Windows 10 servicing plans you need:
- An Active Software Update Point
- Enable Heartbeat Discovery – Data displayed in the Windows 10 servicing dashboard is found by using discovery
- Install WSUS hotfixes and follow the required manual installation steps that are outlined in the KB3159706 article
- Install WSUS hotfix to enable WSUS support for Windows 10 feature upgrades
- Enable Windows 10 product and Upgrade classification in your software update point
Once the first 4 steps are completed, let’s bring Windows 10 upgrade packages to your software update point :
- Open the SCCM Console
- Go to Administration \ Site Configuration \ Sites
- On the top ribbon, select Configure Site component and Software Update Point

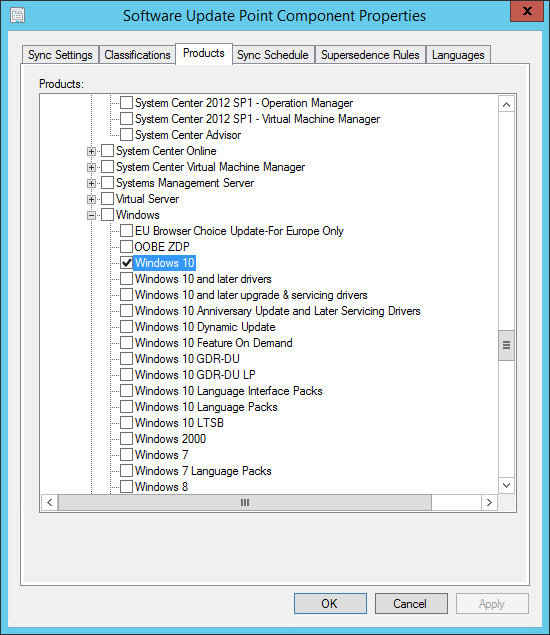
- In the Products tab, select Windows 10
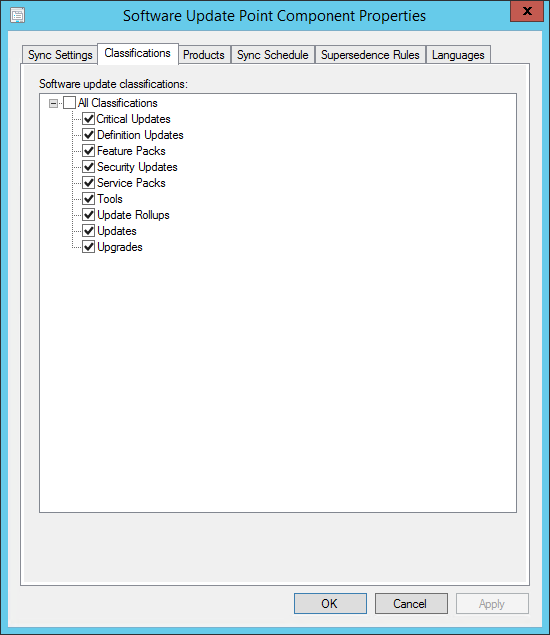
- In the Classifications tab, select Upgrades
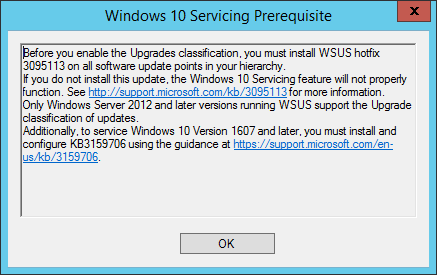
- Accept the prerequisite warning. Go back and install these hotfixes if you haven’t done it before
- Close the Software Update Point Component properties window
- Go to Software Library \ Windows 10 Servicing
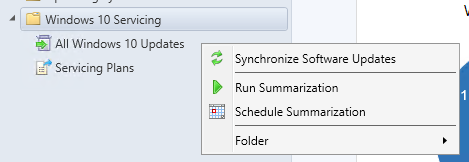
- Right-click Windows 10 Servicing, select Synchronize Software Updates
- As for any Software Update synchronization process, follow the action in Wsyncmgr.log in your SCCM installation directory
- Once completed, go to Software Library \ Windows 10 Servicing \ All Windows 10 Updates
- You should have Windows 10 Upgrade packages listed

Feature Updates vs Upgrades
After your synchronization, you’ll notice 2 types of packages. This is a bit confusing. As you can see in the screenshot, for Windows 1607 Enterprise, we only has Feature Update to Windows 10 Enterprise we don’t have an Upgrade to Windows 10 Enterprise package for 1607… yet.
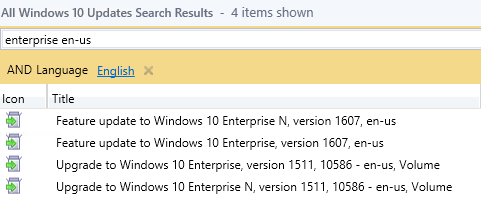
Why ?
The short story : At the time of this writing, the 1607 build is in the Current Branch readiness state. (listed as Feature Update). When this build falls into Current Branch for Business (Approximately 4 months), a new release will be available in Windows Update and then in SCCM (listed as Upgrade).
- Feature Upgrade : New build at the time of the release
- Upgrade : Feature Update + Servicing Update (Patches) since media first published

In this post, we’ll be using Feature Updates. During our tests, we also tried the Upgrade package on a 1507 computer (1507 -> 1511) without issues. If you have both available at the time of creating your servicing plan, use the Upgrade package since it includes Servicing Updates.
Long Story : If you want the Microsoft version, refer to the complete Technet documentation.
The 2 key phrases from this documentation are:
- Feature upgrades that install the latest new features, experiences, and capabilities on devices that are already running Windows 10. Because feature upgrades contain an entire copy of Windows, they are also what customers use to install Windows 10 on existing devices running Windows 7 or Windows 8.1, and on new devices where no operating system is installed
- Approximately four months after publishing the feature upgrade, Microsoft uses Servicing Branch #1 again to republish/updated installation media for Windows 10 Pro, Education, and Enterprise editions. The updated media contains the exact same feature upgrade as contained in the original media except Microsoft also includes all the servicing updates that were published since the feature upgrade was first made available. This enables the feature upgrade to be installed on a device more quickly, and in a way that is potentially less obtrusive to users.
Create Servicing Plans
Now that we have Windows 10 upgrade packages in SCCM, we can create a servicing plan for our Windows 10 devices. Servicing Plan and Automatic Deployment Rules shares the same engine so you won’t be disoriented by servicing plans.
[su_box title=”Warning” style=”glass” box_color=”#dac6c6″ title_color=”#F0F0F0″]Servicing plans are designed to upgrade Windows 10 from one build to another build only. You can’t use that to upgrade Windows 7 to Windows 10. If you need to upgrade your Windows 7 to Windows 10 use the Upgrade Task Sequence instead.[/su_box]
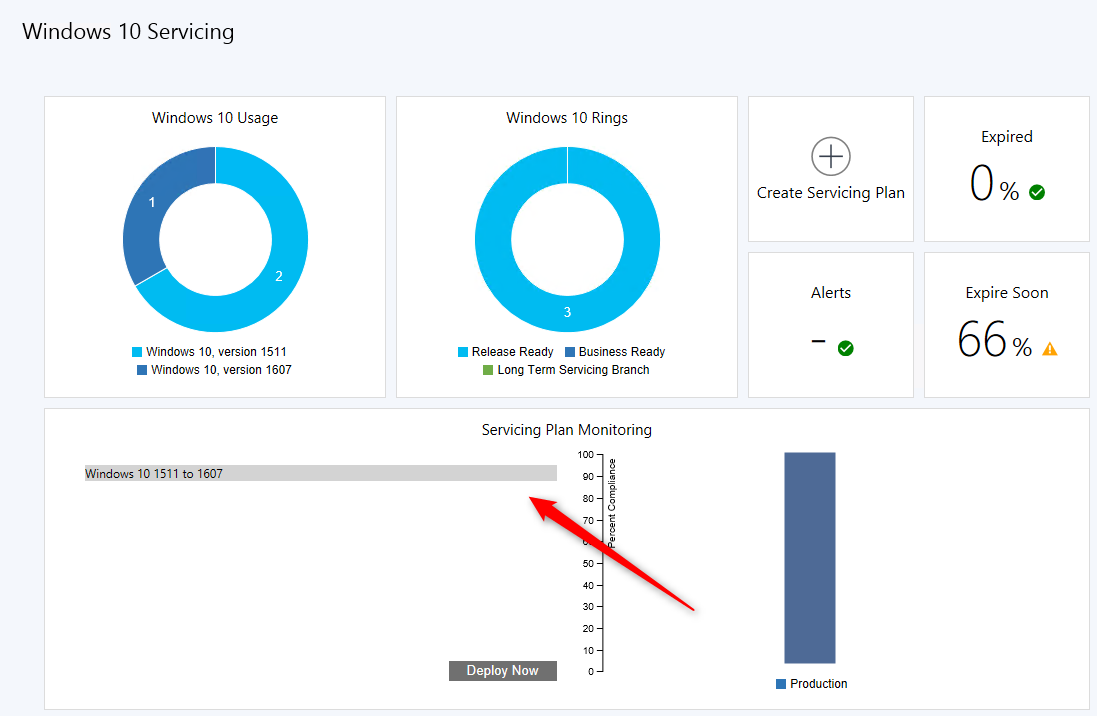
Looking at the Windows 10 Servicing dashboard, our 3 Windows 10 1511 are near expiration (Expire Soon).

- Go to Software Library \ Windows 10 Servicing \ Servicing Plan
- Right-click Servicing Plan and select Create Servicing Plan

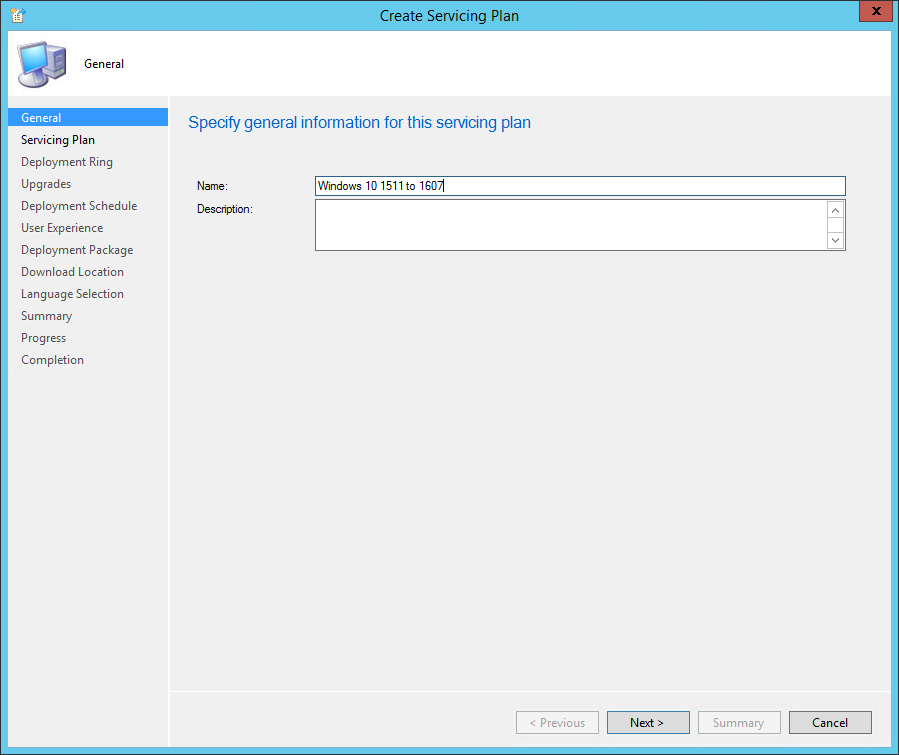
- In the General Pane, give a Name and Description, click Next
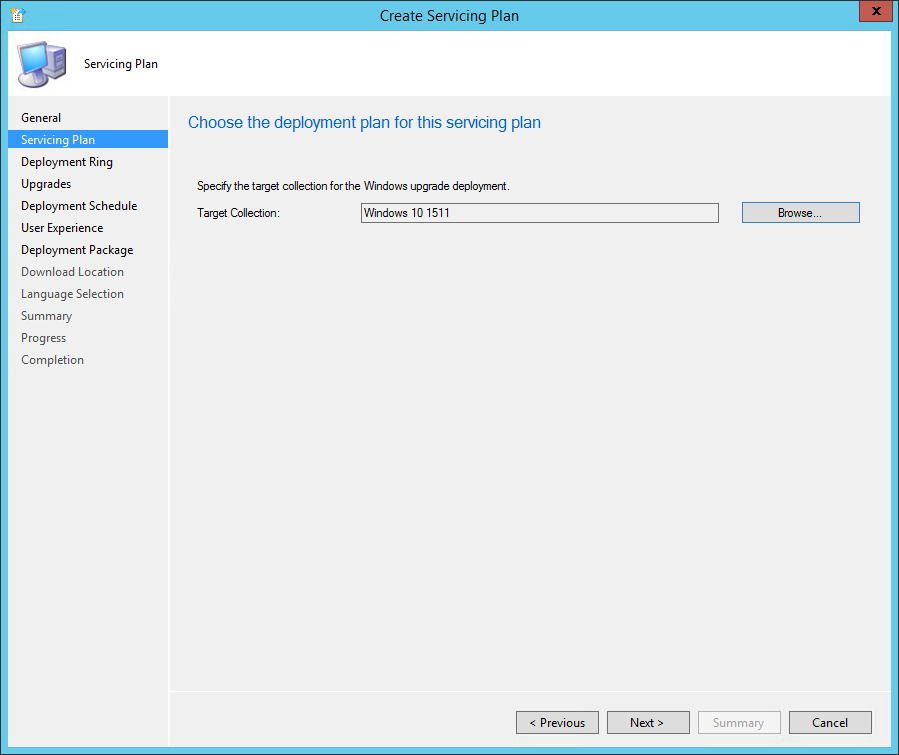
- On the Servicing Plan tab, click Browse and select your Target Collection
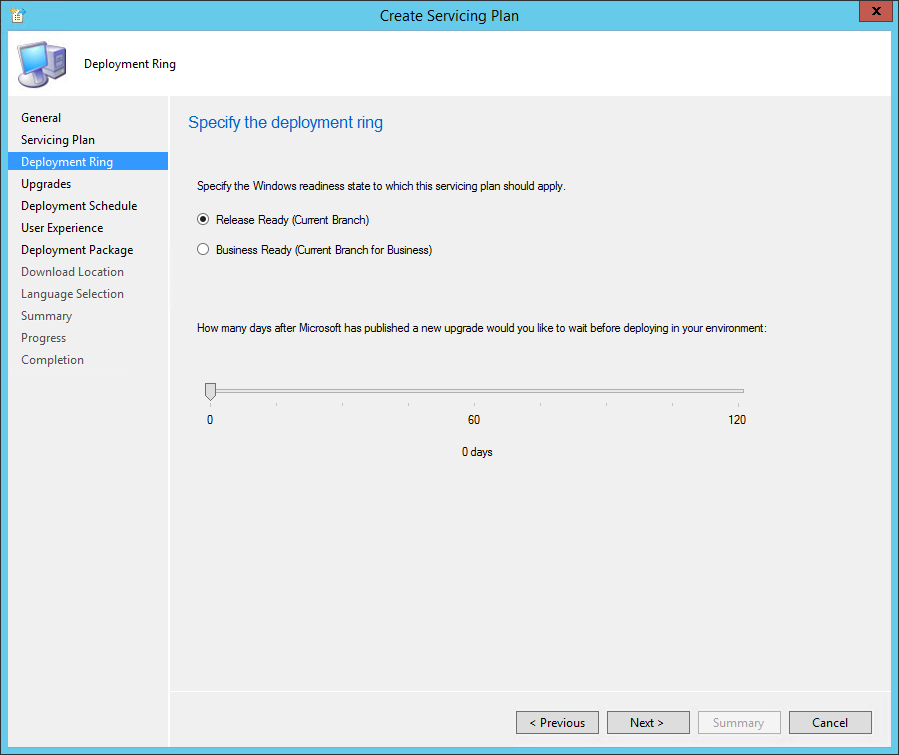
- In the Deployment Ring tab :
- Specify the Windows readiness state to which your servicing plan should apply
- Specify how many days you want to wait before deploying
- In the Upgrade tab, specify the Language, Required and Title of the upgrade packages you want to deploy. This is a nice addition to the SCCM 1602 release, in 1511 all languages were downloaded
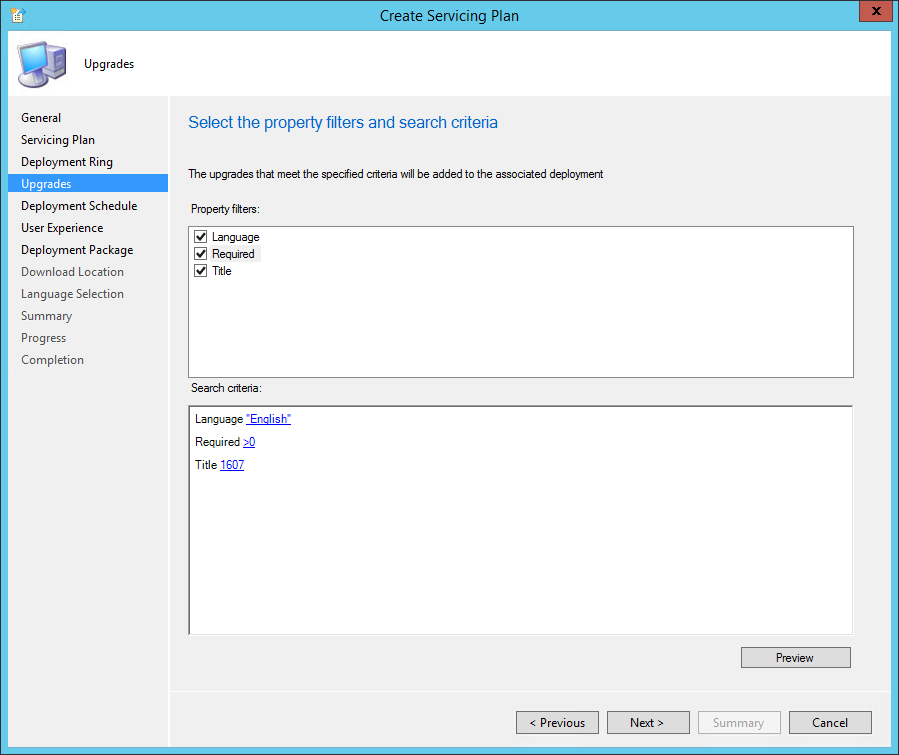
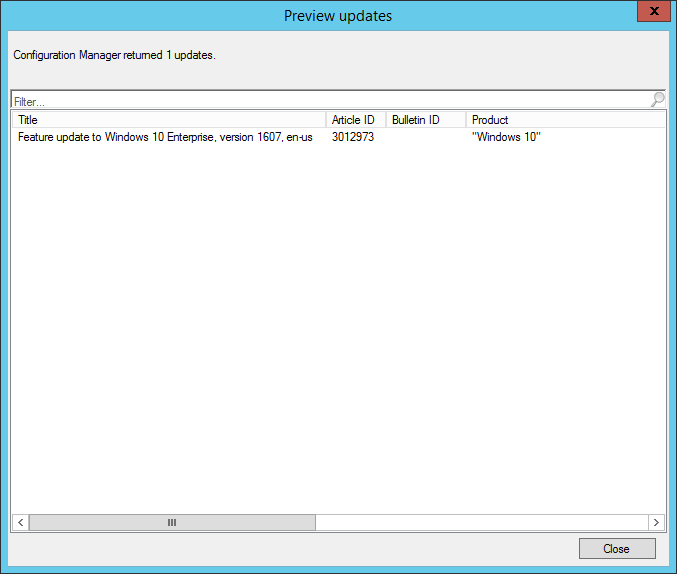
- Use the Preview button to ensure that you are targeting the right version (We are targeting Windows 10 1607 Enterprise en-us devices that are Required)
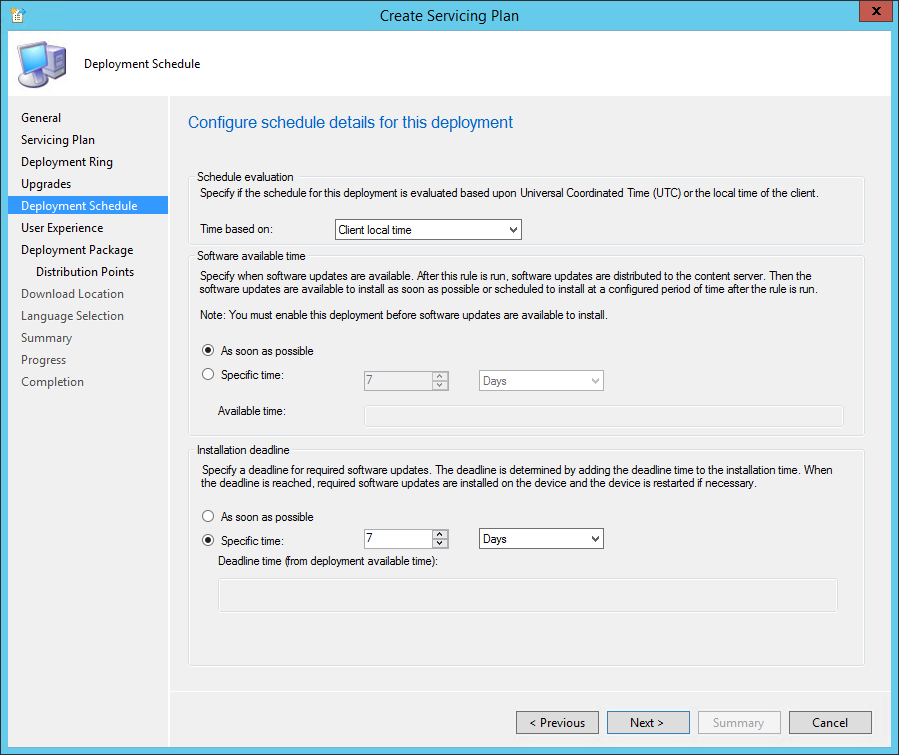
- In the Deployment Schedule tab, select the desired behavior
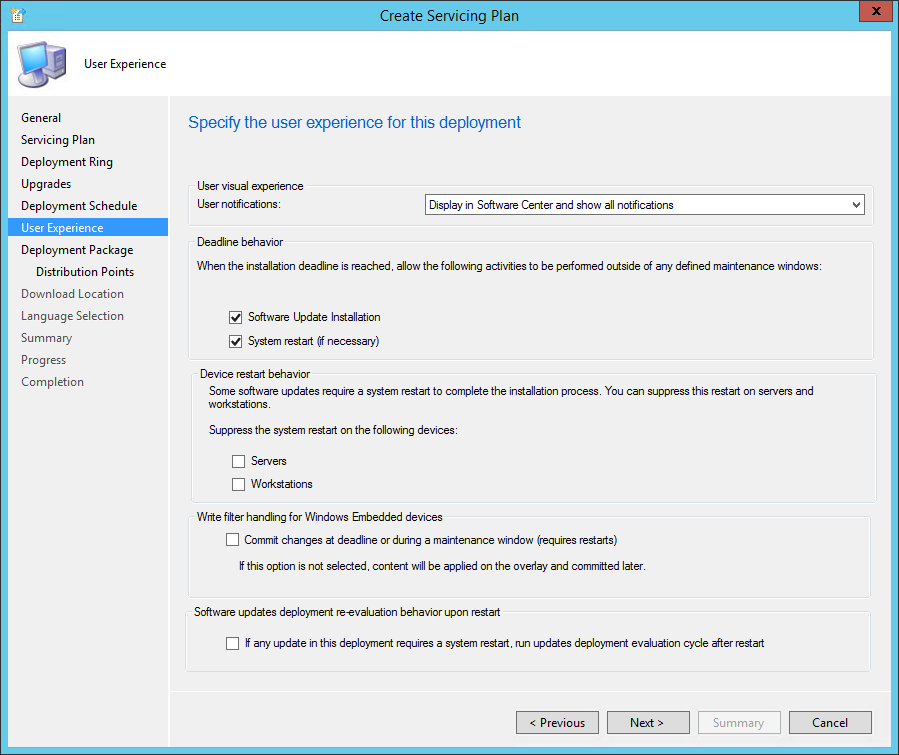
- In the User Experience tab, select the desired options
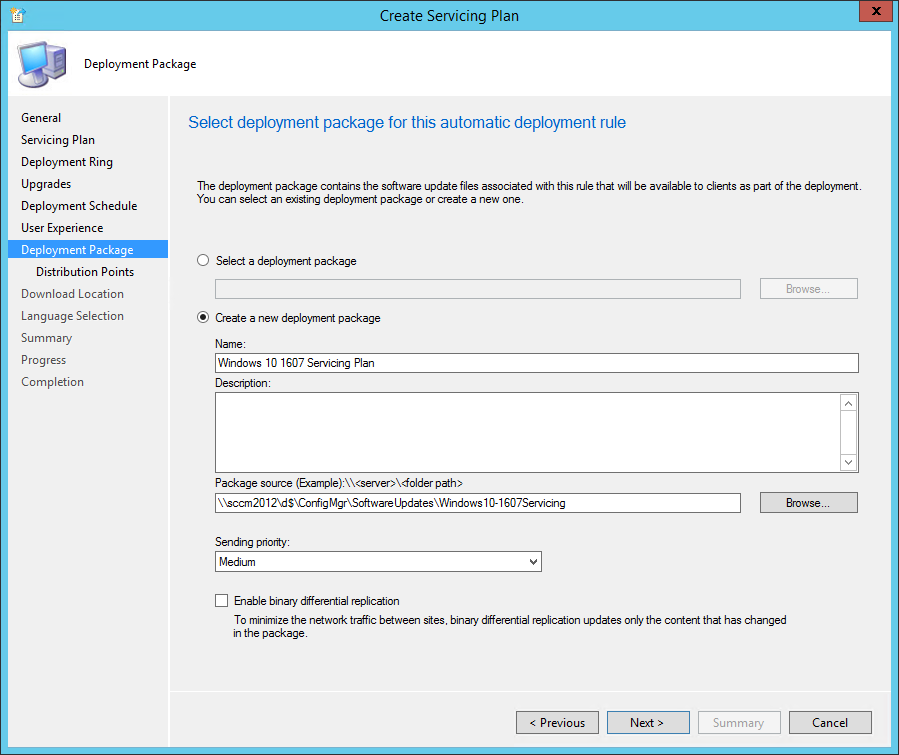
- In the Deployment Package tab, select Create a new deployment package and enter your Package Source path
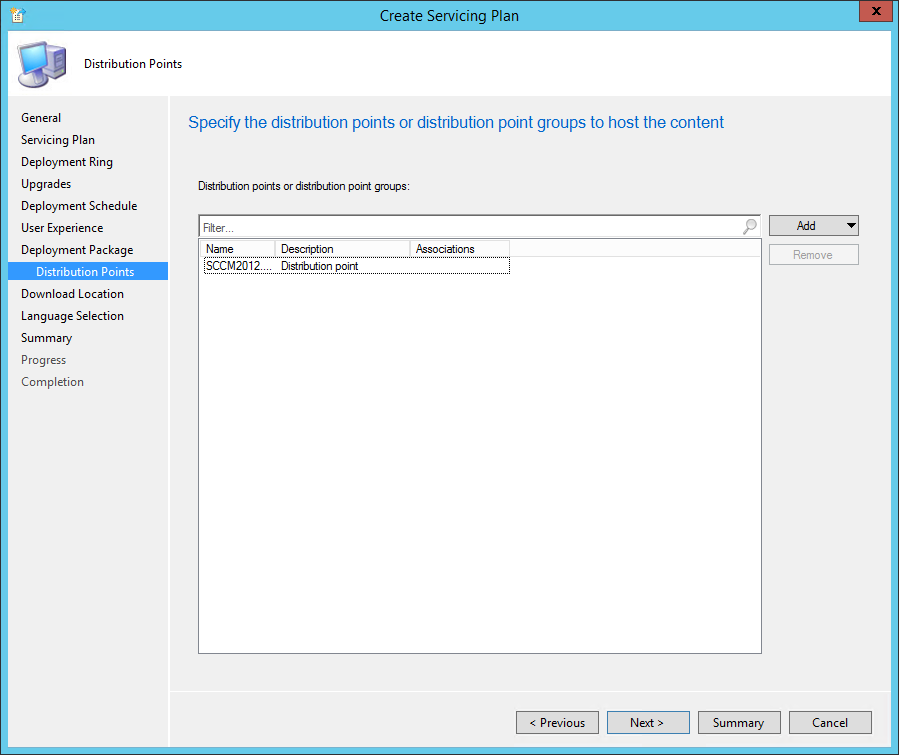
- In the Distribution Points tab, select your distribution point
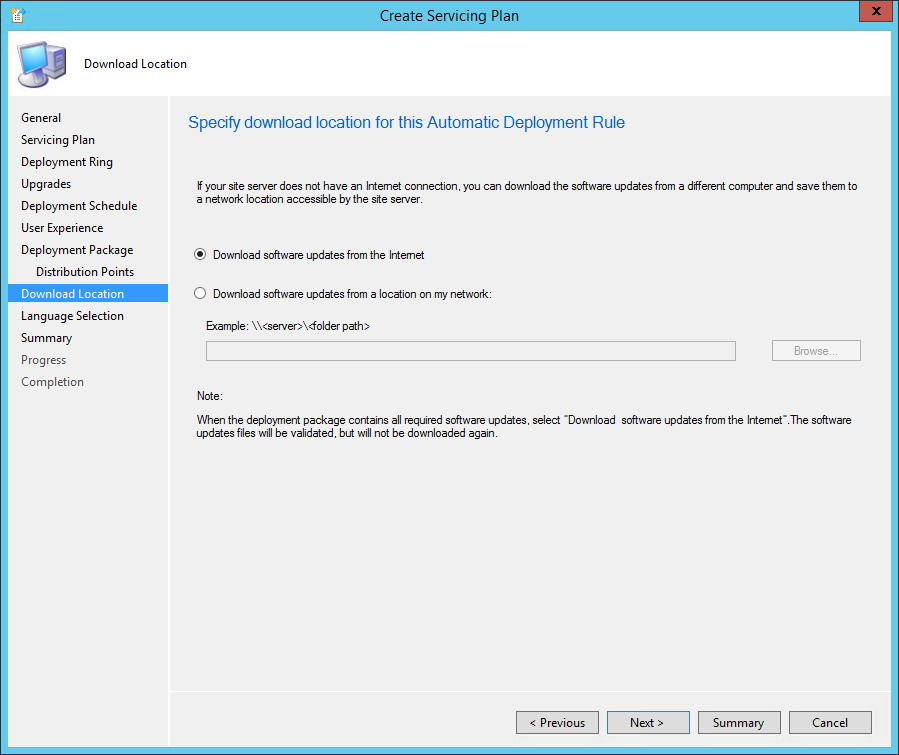
- In the Download Location tab, select Download software updates from the Internet
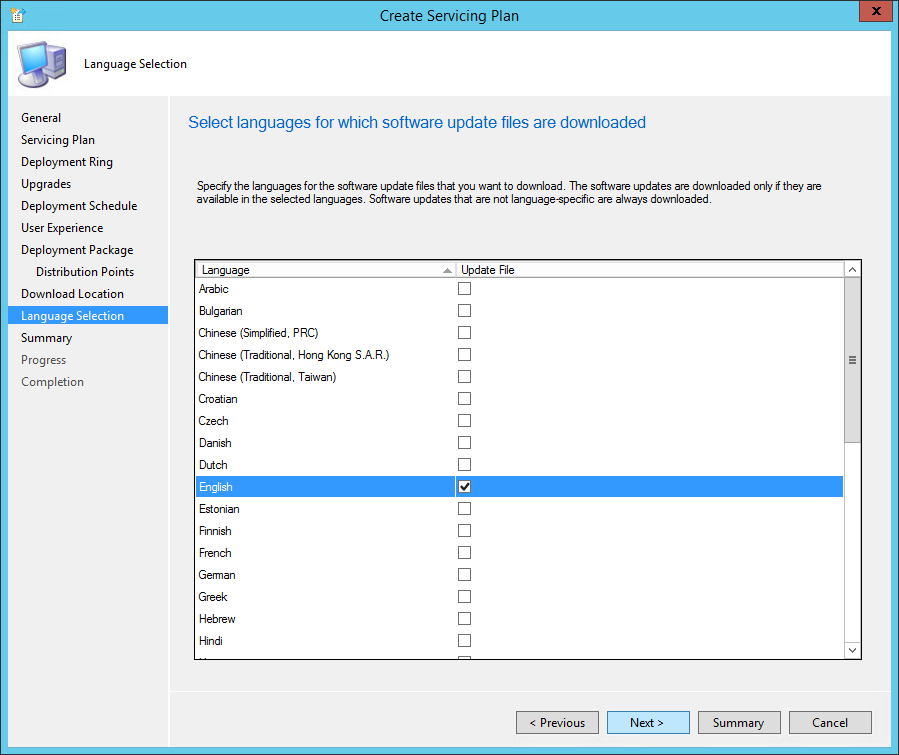
- In the Language Selection tab, select your language
- In the Summary tab, review your settings and close the Create Servicing Plan wizard
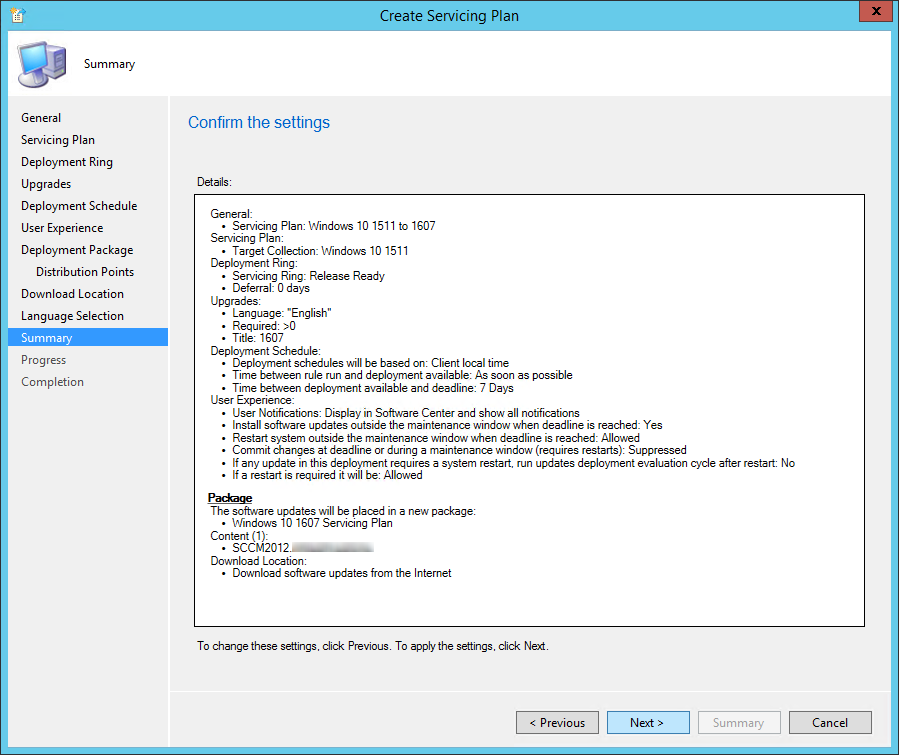
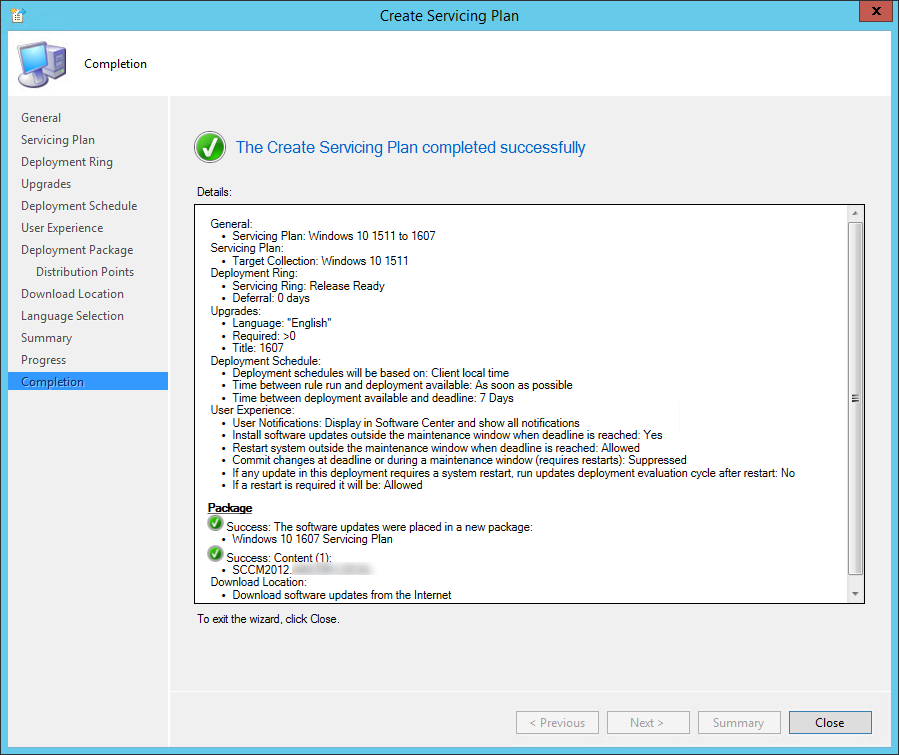
- Right-click your newly created Servicing Plan and select Run Now

- You can see that the deployment gets created in the Monitoring / Deployments section

Servicing Plan Deployment
Now that the deployment are triggered for clients, we will launch the installation manually using software center.
- Log on your Windows 10 computer
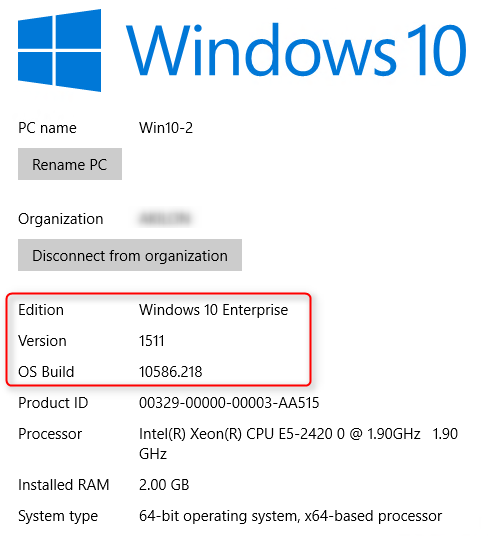
- We verify that we are running Windows 10 Enterprise version 1511 (Build 10586.218)
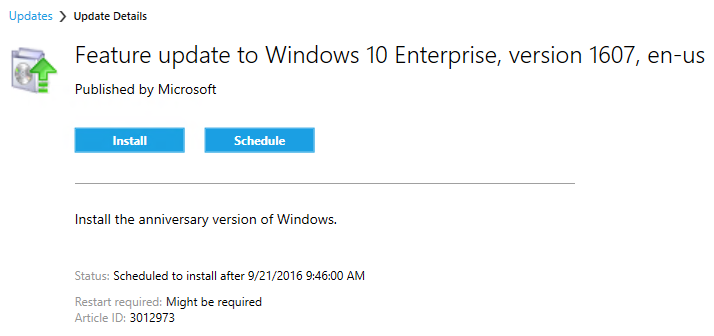
- Open the Software Center, under Updates, Feature Update to Windows 10 Enterprise 1607 is listed

- Select it and select Install
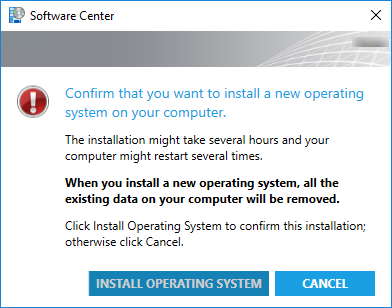
- Accept the warning by clicking Install Operating System. (Your data won’t be lost)
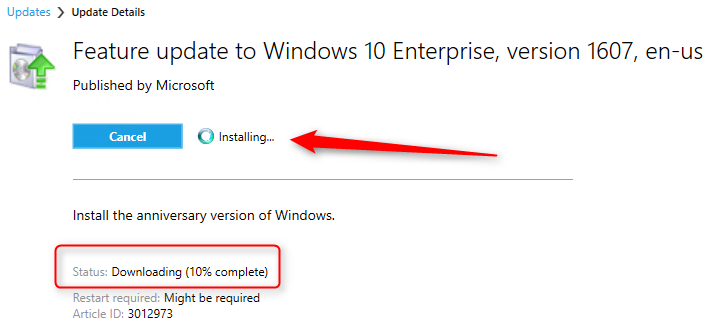
- Installation is running
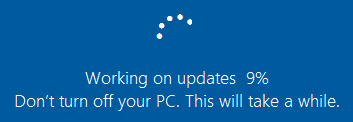
- The computer will restart after about 5 minutes
- The whole upgrade process takes about 30 to 45 minutes and your device will be rebooted several time
- Once completed, log on the computer using your account. Windows is happy to tell you that it’s updated

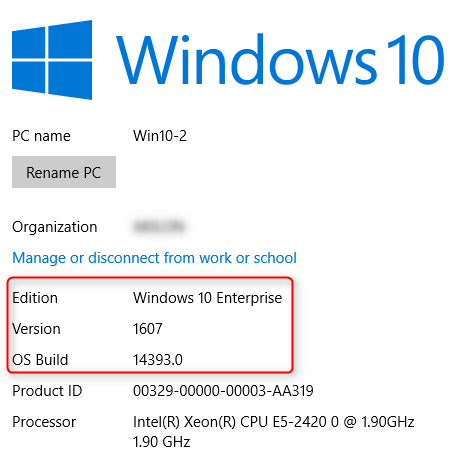
- We are now running Windows 10 Enterprise version 1607 (Build 14393)
- Back in the Software Library \ Windows 10 Servicing \ Servicing Plan node
- Our machine is now listed as version 1607 and is no longer listed as Expire Soon
- The Service Plan Monitoring section can be used to monitor compliance and you can use the Deploy Now button to deploy the same service plan to a new collection
Use the comment section to tell which upgrade method you are preferring.


Per
01.17.2017 AT 09:13 AMLuciano
12.20.2016 AT 01:16 PMusername
12.14.2016 AT 12:07 PMAidan
11.15.2016 AT 09:51 AMunterschied zwischen kredit und finanzierung
02.08.2017 AT 10:58 AMDerek
01.23.2017 AT 12:10 PMAriel Satanov
11.03.2016 AT 02:15 AMBenoit Lecours
11.08.2016 AT 05:09 PMQW
11.08.2016 AT 10:35 PMJonathan Lefebvre
11.09.2016 AT 09:24 AMDBR
10.20.2016 AT 04:15 AMJonathan Lefebvre
10.20.2016 AT 09:13 AMJohn M.
10.04.2016 AT 01:31 PMDanny F
09.28.2016 AT 03:29 AMDanny F
09.28.2016 AT 05:01 AMAlistair
04.04.2017 AT 12:27 PMDavid Adams
09.26.2016 AT 08:08 PMBogdanR
09.21.2016 AT 05:27 AMAnthony
09.21.2016 AT 08:16 PM