
The PDF file is a 162 pages document that contains all informations to install and configure SCCM Current Branch. Use our products page or use the button below to download it . |
This blog post has been updated. Please refer to the new SCCM Current Branch Installation Guide. |
In this part of SCCM 2012 and SCCM 1511 blog series, we will describe how to install SCCM 2012 or SCCM 1511 Enrollment Point and Enrollment Proxy Point site system roles.
Role Description
The Enrollment Point uses PKI certificates for Configuration Manager to enroll mobile devices, Mac computers and to provision Intel AMT-based computers.
The Enrollment Proxy Point manages Configuration Manager enrollment requests from mobile devices and Mac computers.
This is not a mandatory site system but you need both Enrollment Point and Enrollment Proxy Point if you want to enroll legacy mobile devices, Mac computers and to provision Intel AMT-based computers. Since modern mobile devices are mostly managed using Windows Intune, this post will focus mainly on Mac computers enrollment.
Site System Role Placement in Hierarchy
The SCCM 2012 Enrollment Point and Enrollment Proxy Point are site-wide options. It’s supported to install those roles on a stand-alone or child Primary site. It’s not supported to install it on a Central Administration site or Secondary site.
You must install an SCCM 2012 Enrollment Point in the user’s forest so that the user can be authenticated if a user enrolls mobile devices by using SCCM and their Active Directory account is in a forest that is untrusted by the site server’s forest.
When you support mobile devices on the Internet, as a security best practice, install the Enrollment Proxy Point in a perimeter network and the Enrollment Point on the intranet.
Prerequisites
Beginning with System Center 2012 Configuration Manager SP2, the computer that hosts the SCCM 2012 Enrollment Point or Enrollment Proxy Point site system role must have a minimum of 5% of the computers available memory free to enable the site system role to process requests. When those site system role are co-located with another site system role that has this same requirement, this memory requirement for the computer does not increase, but remains at a minimum of 5%.
Using Windows Server 2012, the following features must be installed before the role installation:
Enrollment Point
Features:
- .NET Framework 3.5
- .NET Framework 4.5
- HTTP Activation (and automatically selected options)
- ASP.NET 4.5
- Common HTTP Features
-
- Default Document
- Application Development
- ASP.NET 3.5 (and automatically selected options)
- .NET Extensibility 3.5
- ASP.NET 4.5 (and automatically selected options)
- .NET Extensibility 4.5
- IIS 6 Management Compatibility
- IIS 6 Metabase Compatibility
Enrollment Proxy Point
Features:
- .NET Framework 3.5
- .NET Framework 4.5
- HTTP Activation (and automatically selected options)
- ASP.NET 4.5
IIS Configuration:
- Common HTTP Features
- Default Document
- Static Content
- Application Development
- ASP.NET 3.5 (and automatically selected options)
- ASP.NET 4.5 (and automatically selected options)
- .NET Extensibility 3.5
- .NET Extensibility 4.5
- Security
- Windows Authentication
- IIS 6 Management Compatibility
- IIS 6 Metabase Compatibility
SCCM 2012 Enrollment Point Installation
For this post we will be installing both roles on a stand-alone Primary site using HTTPS connections. If you split the roles between different machine, do the installation section twice, once for the first site system (selecting Enrollment Point during role selection) and a second time on the other site system (selecting Enrollment Proxy Point during role selection).
- Open the SCCM console
- Navigate to Administration / Site Configuration / Servers and Site System Roles
- Right click your Site System and click Add Site System Roles
- On the General tab, click Next
- On the Proxy tab, click Next
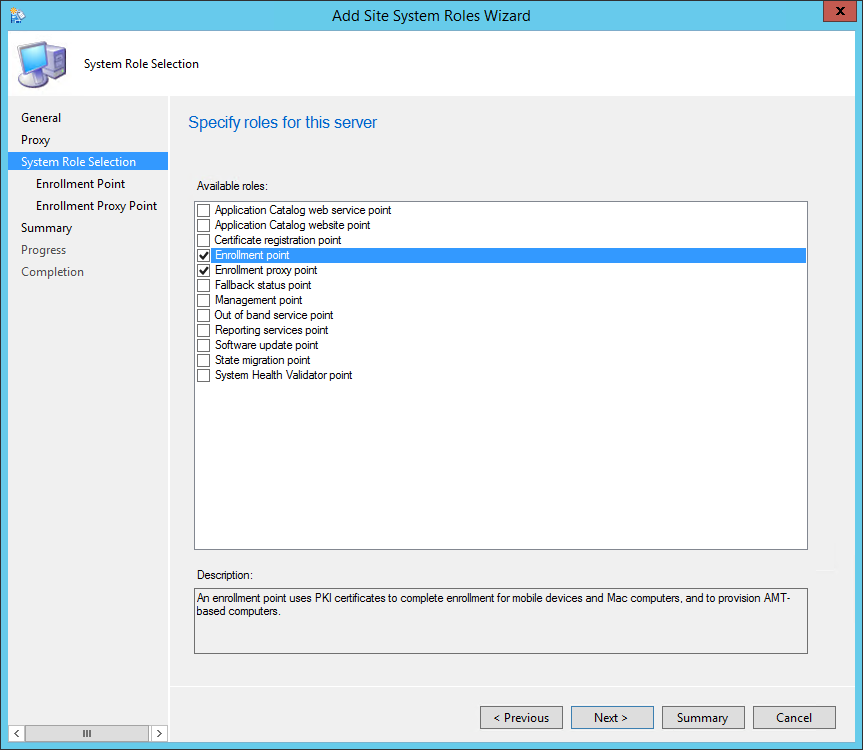
- On the Site System Role tab, select Enrollment Point and Enrollment Proxy Point, click Next

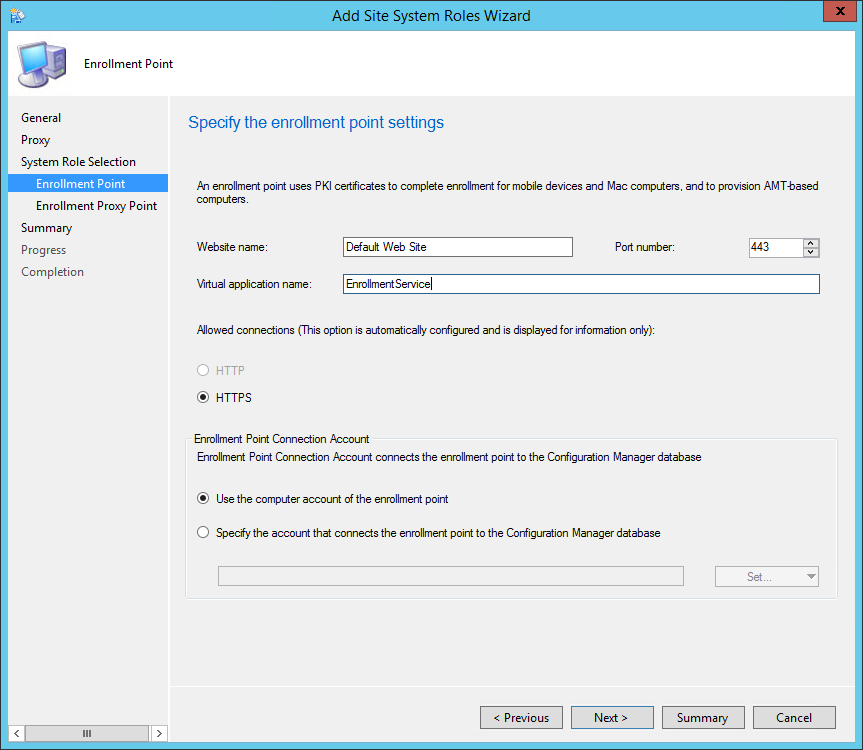
- On the Enrollment Point tab
- In the IIS Website and Virtual application name fields, leave both to the default values
- This is the names that you’ll see in IIS after the installation
- Enter the port number you want to use. The HTTPS setting is automatically selected and requires a PKI certificate on the server for server authentication to the Enrollment Proxy Point and for encryption of data over SSL. For more information about the certificate requirements, see PKI Certificate Requirements for Configuration Manager.
- In the IIS Website and Virtual application name fields, leave both to the default values

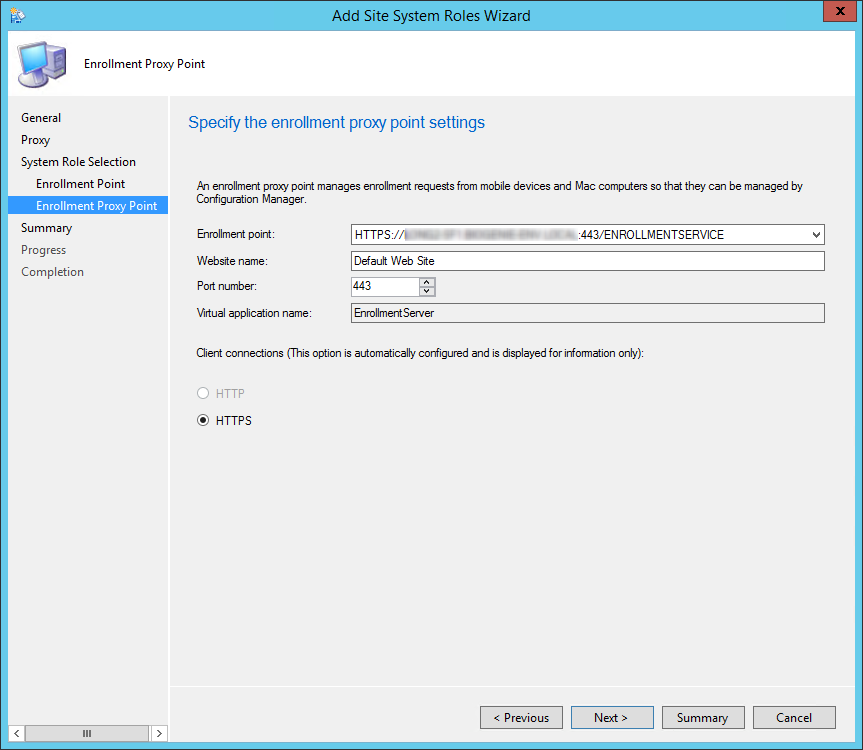
- On the Enrollment Proxy Point tab,
- The Enrollment point will be populated by default and can’t be changed
- Keep the Website name to it’s default value
- Enter the port and protocol that you want to use
- The Virtual application name can’t be changed. This will be used for client installation (https://servername/EnrollmentServer)

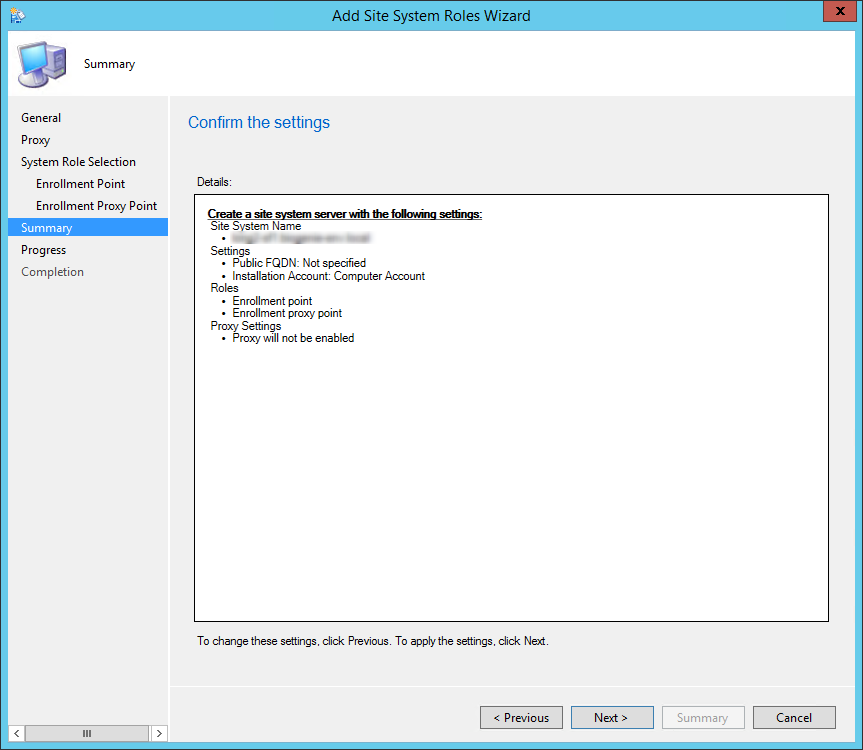
- On the Summary tab, review your settings, click Next and complete the wizard
Verification and Logs files
Logs
You can verify the role installation in the following logs:
- ConfigMgrInstallationPath\Logs\enrollsrvMSI.log and enrollmentservice.log – Records details of about the Enrollment Point installation
- ConfigMgrInstallationPath\Logs\enrollwebMSI.log – Records details of about the Enrollment Proxy Point installation
- ConfigMgrInstallationPath\Logs\enrollmentweb.log – Records communication between mobile devices and the Enrollment Proxy Point
That’s it, you’ve installed your SCCM 2012 Enrollment Point, follow this Technet Guide if you want to proceed to next steps for Mac computers enrollment


Paul Brawn
01.22.2018 AT 06:27 AM