
As an SCCM administrator, when a new Windows 10 Feature Update would come out, you’d have to go to Microsoft website and download the latest ISO file and import it as a new Windows Operating System Upgrade Packages. Starting with SCCM 2103, you can now upgrade your SCCM client to Windows 10 by using feature update synchronized through the software update point. This simplifies the process and the size of downloaded content should also be smaller since an ESD file is smaller than a Wim file. In this post, we’ll show you how to deploy Windows 10 feature update using an SCCM task sequence.


Requirement
Before deploying Windows 10 feature update using an SCCM Upgrade task sequence, there’s a few step to follow.
First, verify if you have any Windows 10 Feature Update synchronized in your SCCM console.
- In the SCCM Console
- Go to Software Library \Windows 10 Servicing\All Windows 10 Updates
- Ensure that you have Windows 10 appearing there

If it’s not the case, you first need to enable the synchronization of these update in your Software Update Point. If you already have Feature Update, skip to the next step.
- Go to Administration \ Site Configuration \ Sites
- Click Configure Site Component at the top and select Software Update Point

- In the Classification tab, put a check beside Upgrades

- In the Product tab, select Windows 10

- Initiate a full software update scan by right-clicking the All Windows 10 Updates and select Synchronize Software Updates

Now that your Windows 10 Feature Updates are showing up, you can proceed to the next steps.
Create the SCCM Feature Update Task Sequence
We will now create the SCCM Upgrade Task Sequence to upgrade a Windows 10 client to Windows 10 20H2. You can use this method for any Windows 10 version.
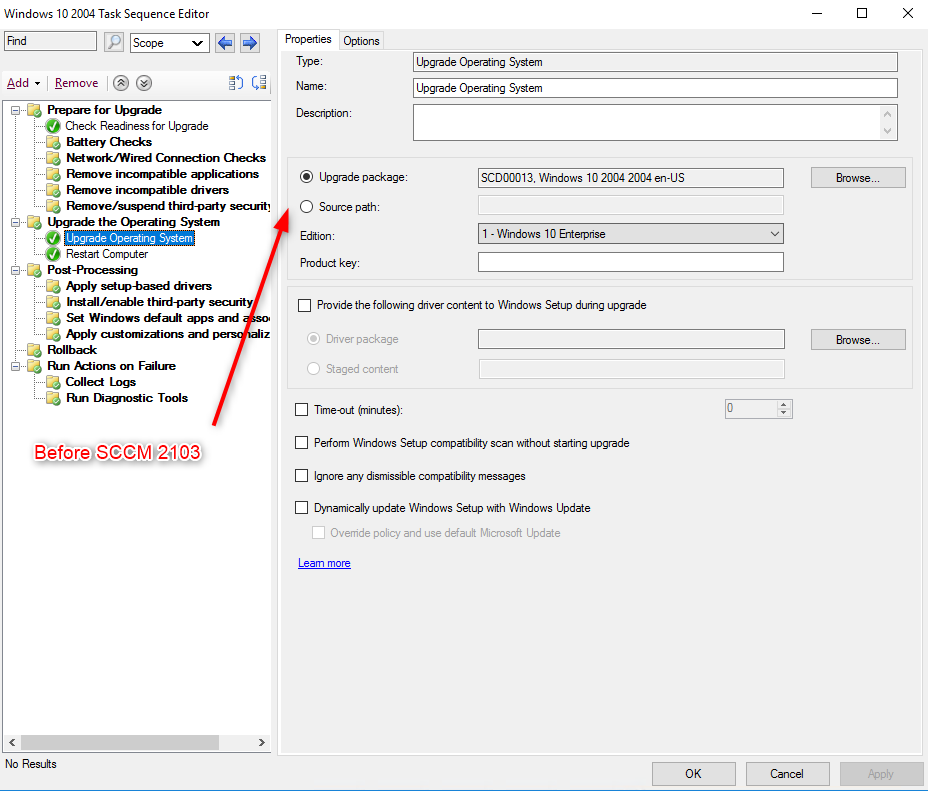
To use the new Feature Update option, you can’t just create a new Upgrade task sequence since the wizard doesn’t include this option…. I’m sure this will change over time but for now, you need to use an existing task sequence and edit the Upgrade Operating System step.

If you never created an Upgrade task sequence, you’ll have to use the alternative method (import Operating System Upgrade package first) since the wizard won’t let you hit Next until an Upgrade Package selection. No extra benefits for you now but at least you’ll be fine in the next Windows version.

Another option would be to create a blank task sequence and add the Upgrade Operating System step manually but you won’t benefit from the built-in task created by the default Upgrade Task Sequence.

The prefered method is to use an existing Windows 10 Upgrade Task Sequence. We will modify a Task Sequence we used to upgrade a previous Windows version.
- Right-Click your Upgrade Task Sequence and click Edit

- Locate the Upgrade Operating System step and click on it
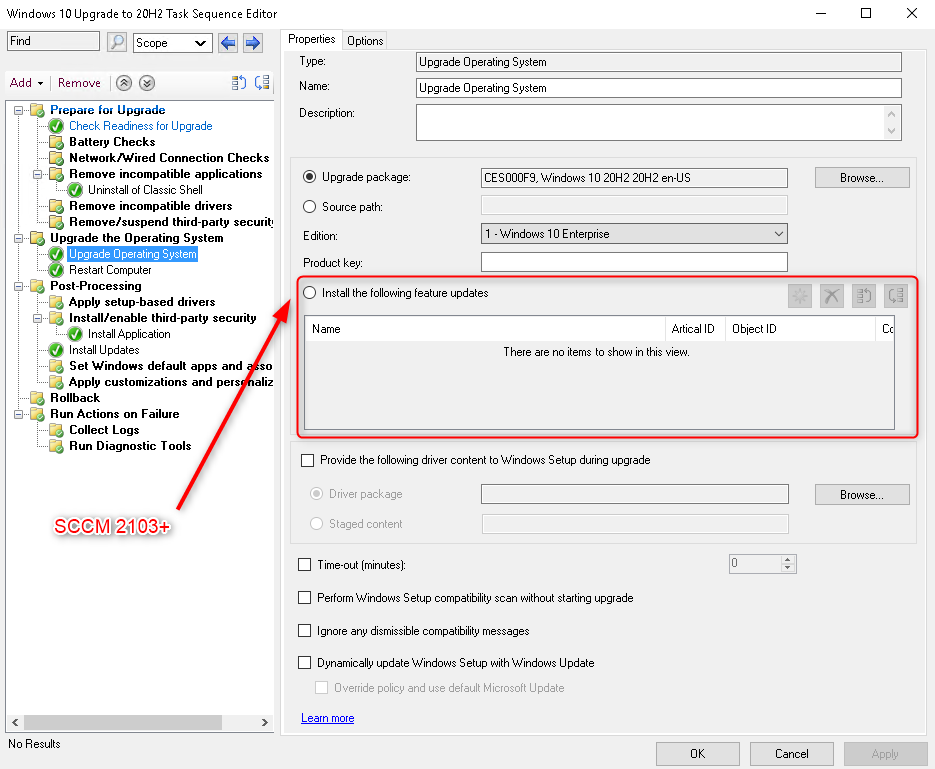
- Instead of using the Upgrade Package option at the top, select Install the following feature updates
- Click on the Star icon to select the desired Windows 10 feature update

- In the new window, go through Classifications / Upgrades / Microsoft / Windows 10
- Select the desired Windows 10 version. You can use the search at the top to ease the process or sort by Required which should show what your clients are requesting

- The interesting part here is that if your environment supports multiple languages or architectures, you can add multiple Windows 10 feature updates. The client will use the first applicable update that’s not superseded by any other deployed updates.
- Once selected, just hit Apply and you’re done

- The only thing left to do is to deploy the Task Sequence to the desired collection

Once deploy to your SCCM clients, your user won’t notice the difference. It’s the same with a feature update in a task sequence as with an OS upgrade package.
We hope this post have been helpful. Happy Windows 10 upgrading.


klonk
01.19.2022 AT 02:15 PMklonk
08.11.2021 AT 09:03 AMbwalz87
05.27.2021 AT 07:20 AMtramsey4
05.14.2021 AT 12:41 PMnbdamman
05.13.2021 AT 09:17 AMJonathan Lefebvre
05.26.2021 AT 02:34 PM