In the second post of this blog series about Windows 10 Deployment using SCCM, we will show you how to create a SCCM Windows 10 Task Sequence and deploy it. Complete the preparation of your environment before reading this post.

This task sequence will help you deploy what we call a “vanilla” Windows 10 using the default Install.wim from the Windows 10 media. This means that you’ll end up with a basic Windows 10 with the SCCM client and nothing else.

You will be able to edit this task sequence later to customize it to your environment.

Create SCCM Windows 10 Task Sequence

  • Open the SCCM Console
  • Go to Software Library \ Operating Systems \ Task Sequences
  • Right-click Task Sequences and select Create Task Sequence
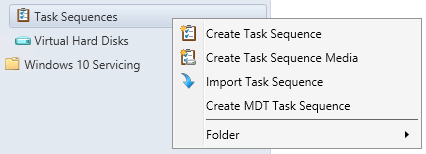
SCCM Windows 10 Task Sequence

  • On the Task Sequence wizard, select Install an existing image package
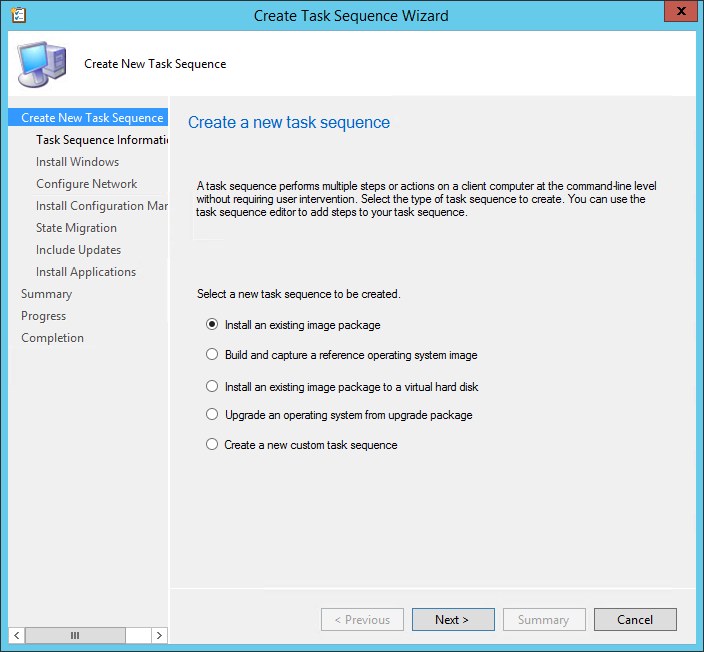
SCCM Windows 10 Task Sequence

  • On the Task Sequence Information pane, enter the desired Name, Description and Boot Image
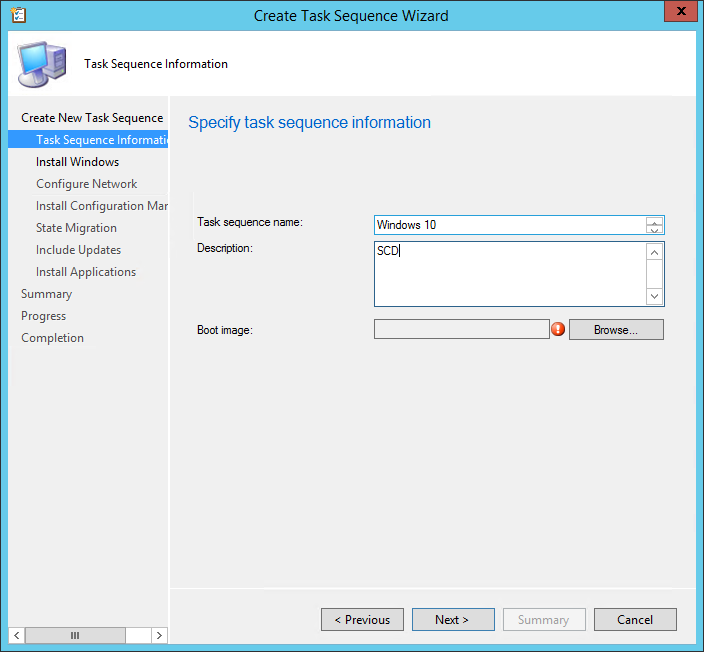
SCCM Windows 10 Task Sequence

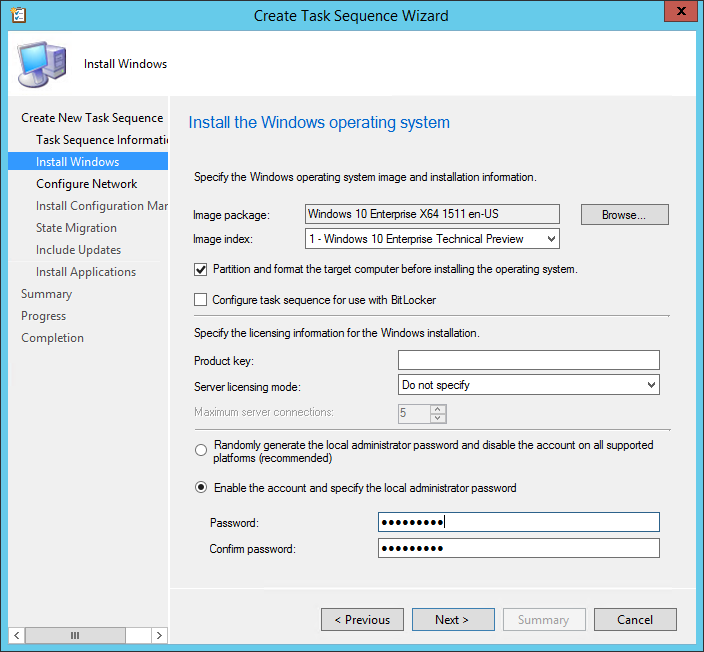
  • On the Install Windows pane, select the Image package and Image index you imported in part 1
  • Leave the check box beside Partition and Format the target computer before installing the operating system
  • For this example we will remove the Configure task sequence for use with Bitlocker
  • Leave the Product key blank, if you are using MAK keys, read this post on how to handle that in your Task Sequence. (TL;DR: Even with MAK key, you need to leave the Product key blank)
  • Enter an Administrator password

SCCM Windows 10 Task Sequence

  • In the Configure Network pane, you can select to Join a workgroup or domain. If you select Join a domain, enter your domain information, OU and credentials
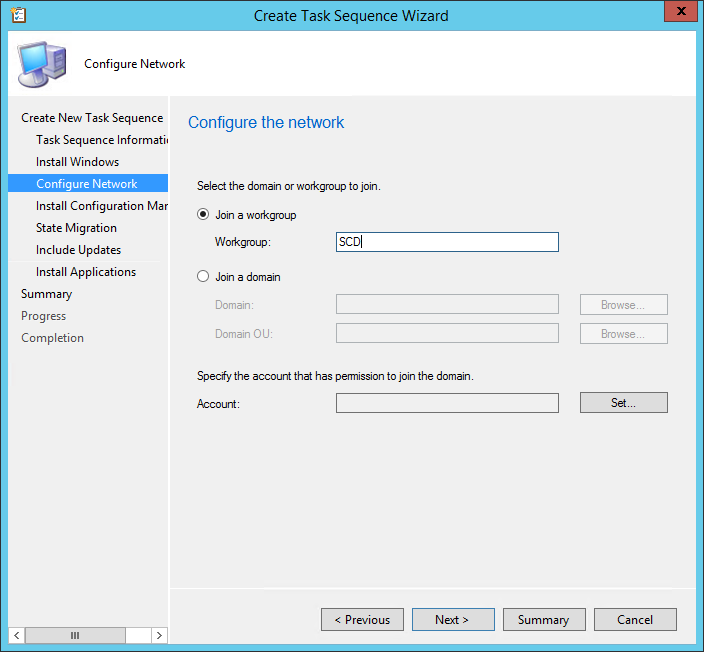
SCCM Windows 10 Task Sequence

  • On the Install Configuration Manager Client pane, select your Configuration Manager Client Package and enter your installation properties
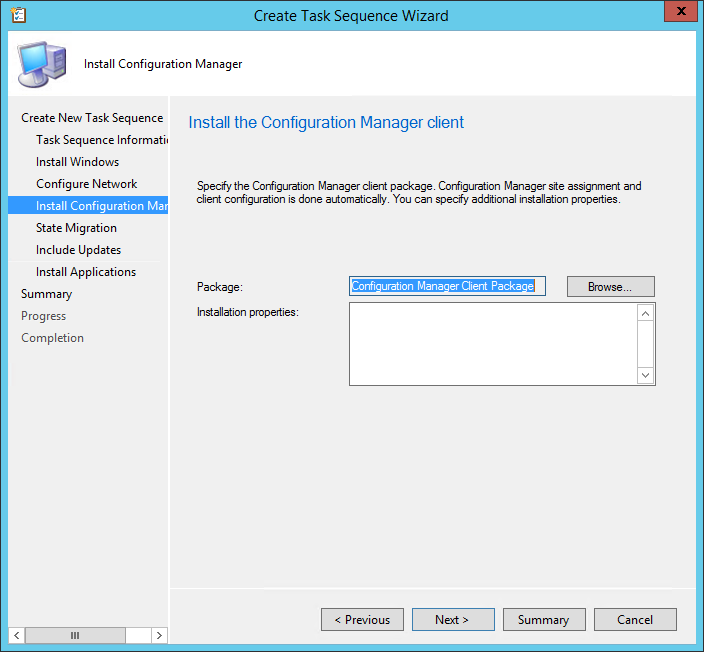
SCCM Windows 10 Task Sequence

  • On the State Migration pane, we will remove all checkbox as we don’t want to use User State Migration at this time
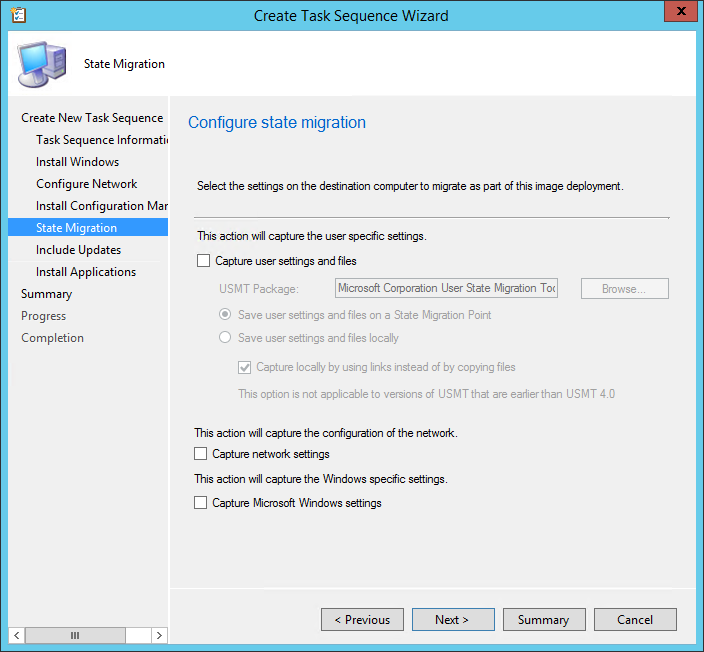
SCCM Windows 10 Task Sequence

  • On the Include Updates pane, select the desired Software Update task
    • All Software Updates will install the updates regardless of whether there is a deadline set on the deployment (on your OSD collection)
    • Mandatory Software Updates will only install updates from deployments that have a scheduled deadline (on your OSD collection)
    • Do not install any software updates will not install any software update during the Task Sequence
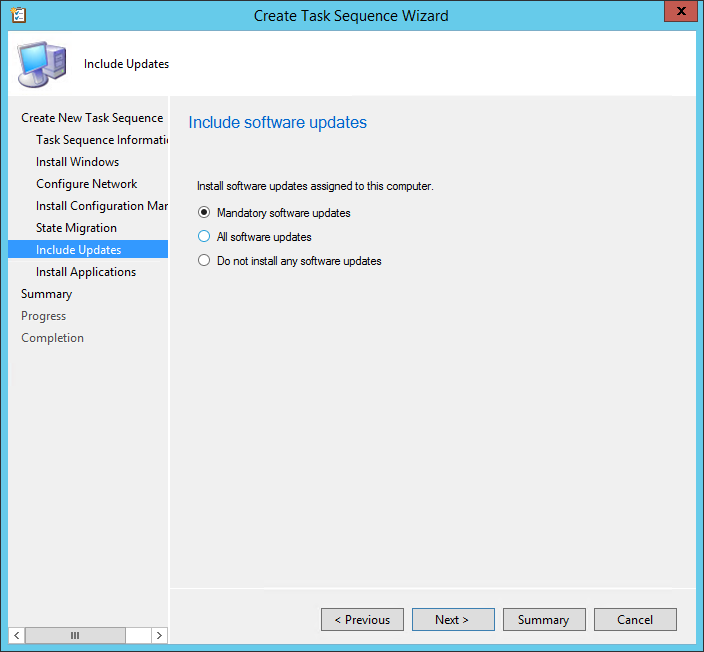
SCCM Windows 10 Task Sequence

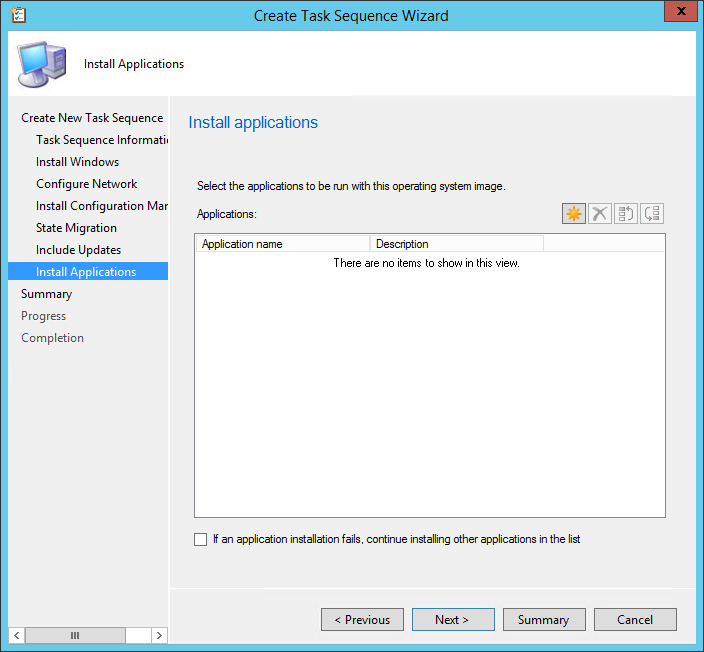
  • On the Install Applications tab, click on the Star Icon to add any application that you want to be installed during your deployment. Only applications will be listed. If you need to add packages, you can add it by editing the task sequence later. Theses applications will be deployed each time the task sequence is executed.
SCCM Windows 10 Task Sequence

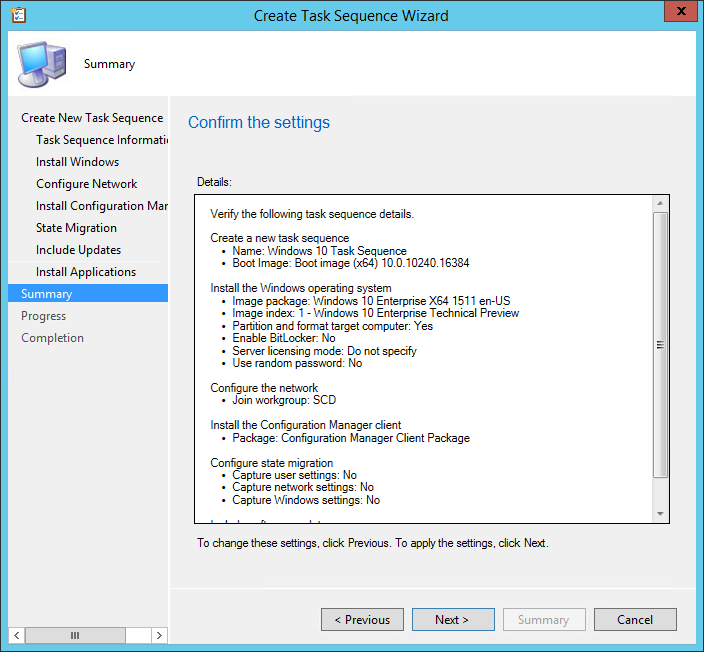
  • On the Summary tab, review your settings and click Next
SCCM Windows 10 Task Sequence

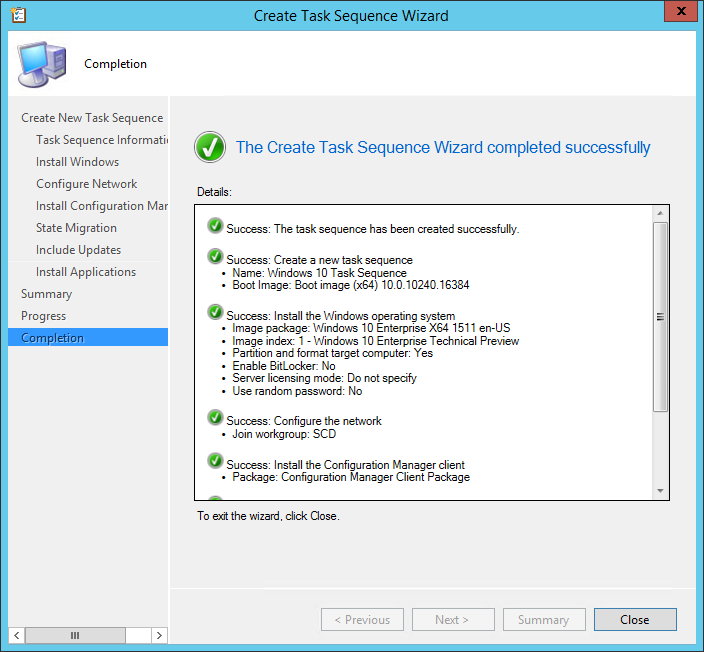
  • On the Completion tab, click Close

SCCM Windows 10 Task Sequence

Deploy Windows 10 Task Sequence

Now that your Task Sequence is created, we will deploy it to a collection and start a Windows 10 deployment.

[su_box title=”Warning” style=”glass” title_color=”#F0F0F0″]Be careful when targeting the deployment. This task sequence will format and install a new OS to targeted devices.[/su_box]

  • Open the SCCM Console
  • Go to Software Library \ Operating Systems \ Task Sequences
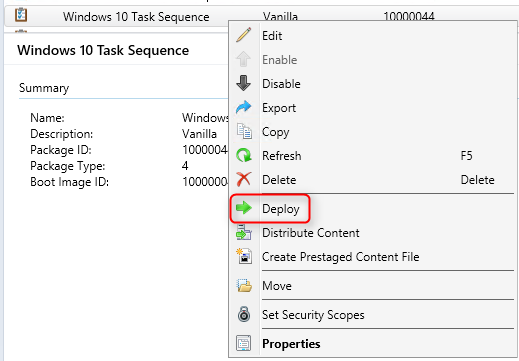
  • Right-click your Windows 10 Task Sequence and select Deploy
SCCM Windows 10 Task Sequence

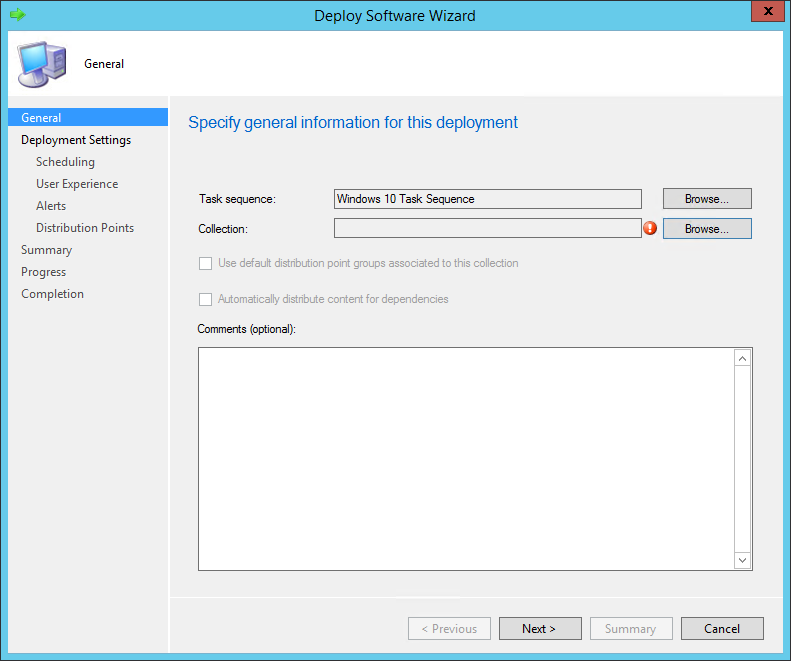
  • On the General pane, select your collection. This is the collection that will receive the Windows 10 installation. For testing purposes, we recommend putting only 1 computer to start
SCCM Windows 10 Task Sequence

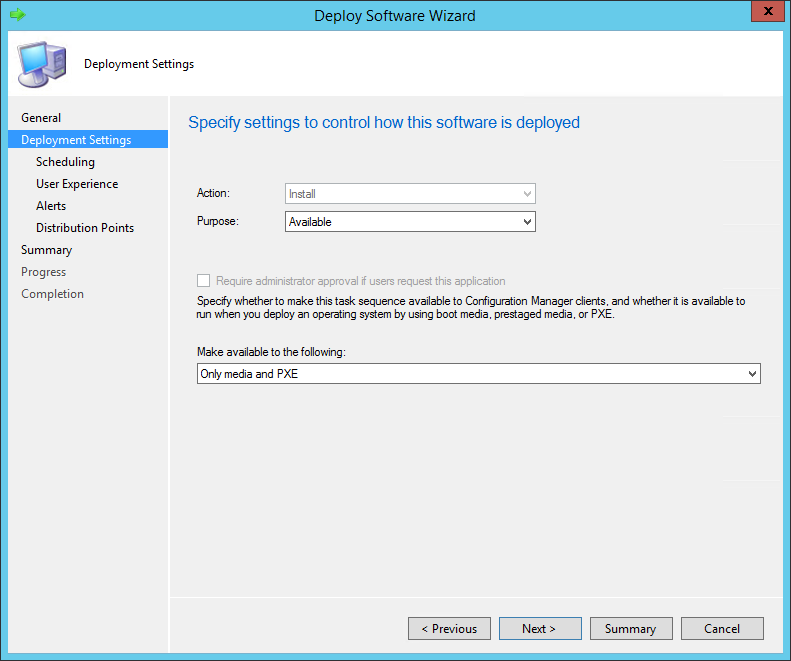
  • Select the Purpose of the deployment
    • Available will prompt the user to install at the desired time
    • Required will force the deployment at the deadline (see Scheduling)
  • In the Make available to the following drop down, select the Only media and PXE. This will ensure that you do not send the deployment on clients. This is also useful to avoid errors, using this options you *could* send the deployment to All Systems and no clients would be able to run the deployment from Windows
SCCM Windows 10 Task Sequence

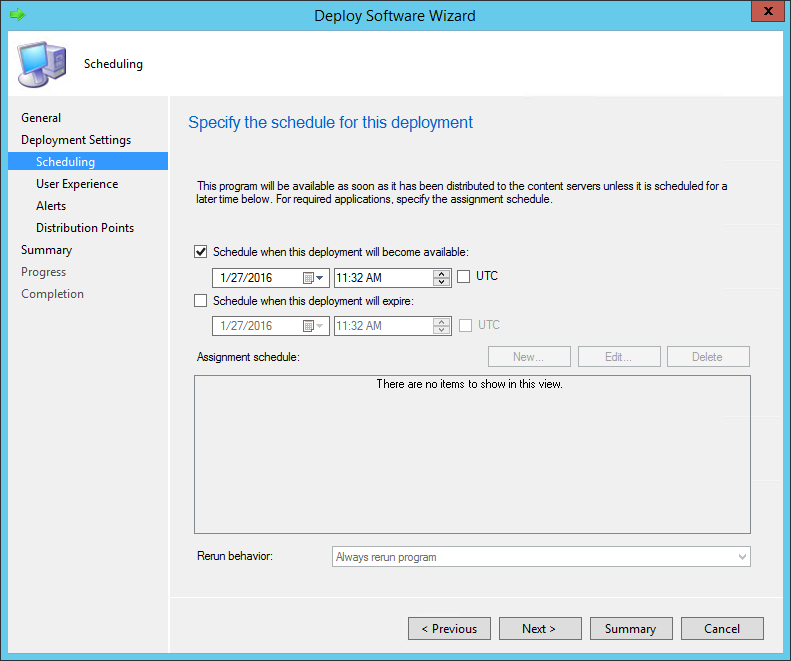
  • On the Scheduling tab, enter the desired available date and time. On the screenshot, we can’t create an Assignment schedule because we select Available in the previous screen
SCCM Windows 10 Task Sequence

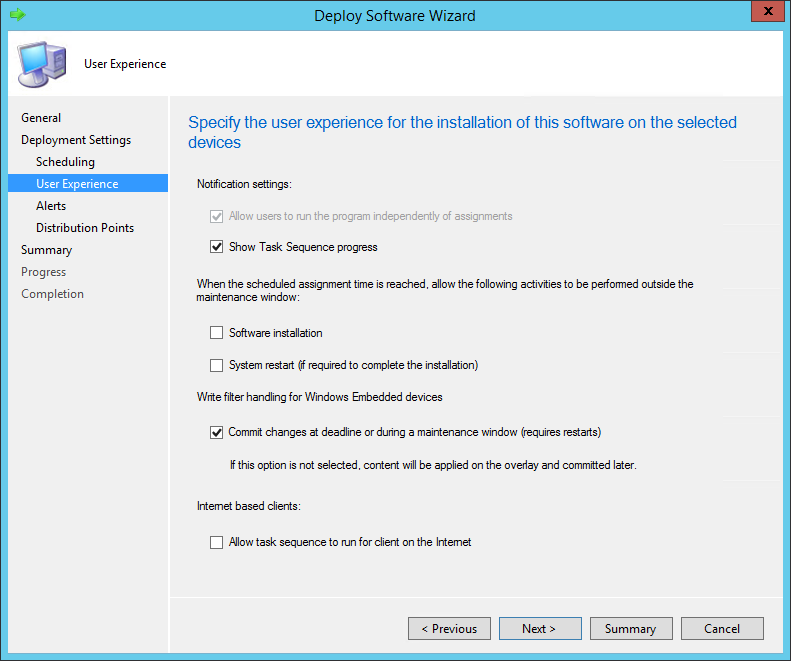
  • In the User Experience pane, select the desired options
SCCM Windows 10 Task Sequence

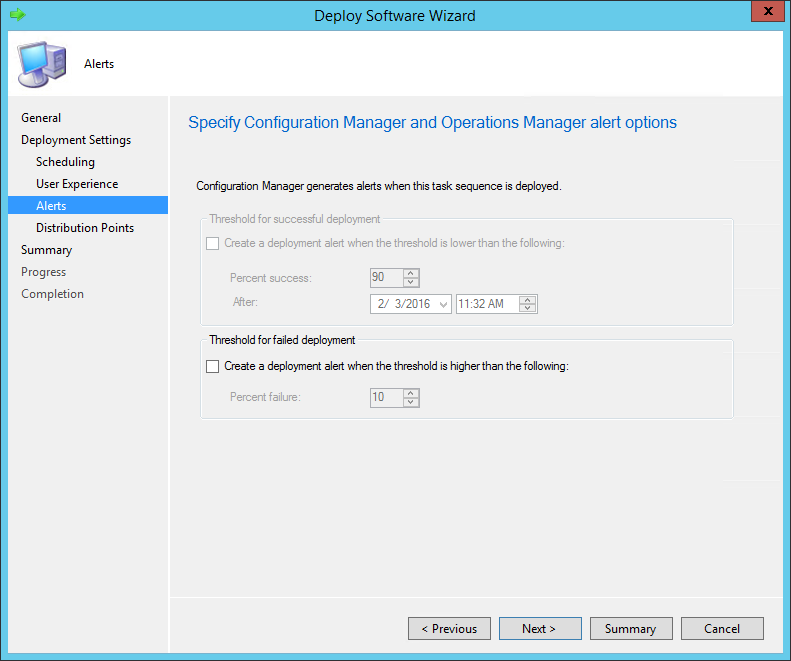
  • In the Alerts tab, check Create a deployment alert when the threshold is higher than the following checkbox if you want to create an alert on the failures
SCCM Windows 10 Task Sequence

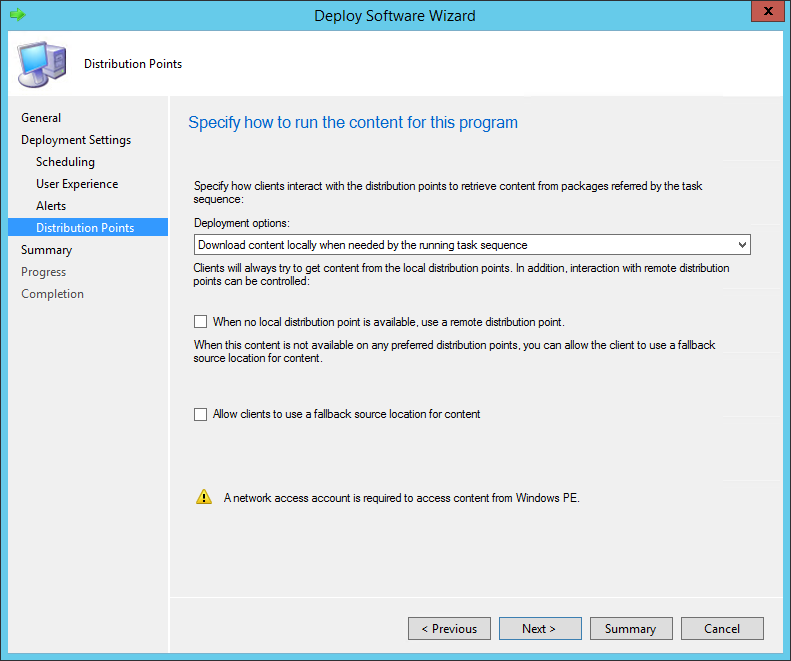
  • On the Distribution Point pane, select the desired Deployment options. We will leave the default options
SCCM Windows 10 Task Sequence

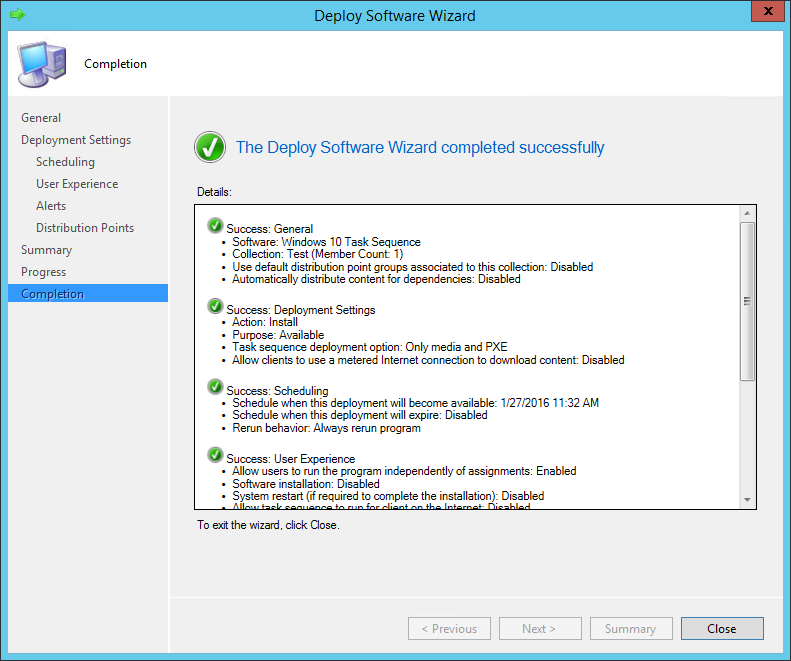
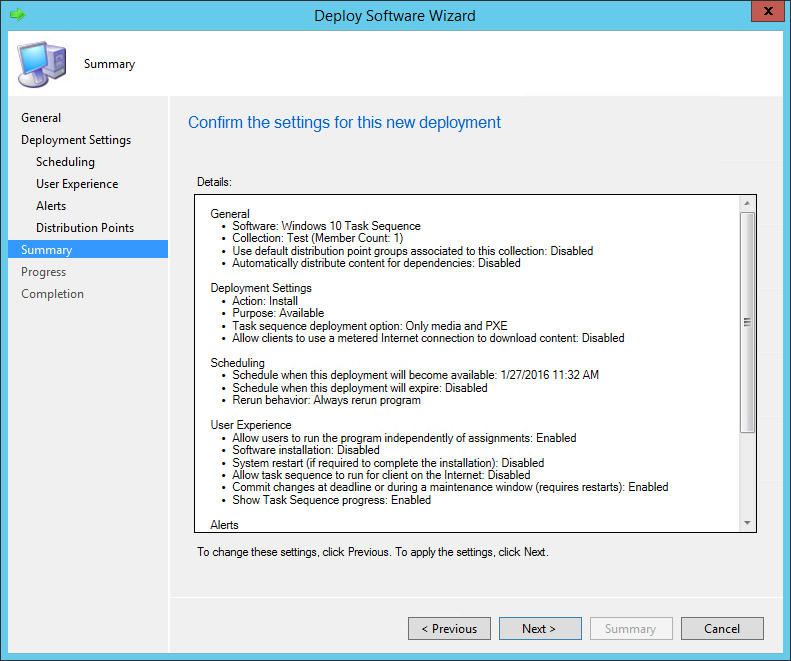
  • Review the selected options and complete the wizard
SCCM Windows 10 Task Sequence SCCM Windows 10 Task Sequence

PXE Boot

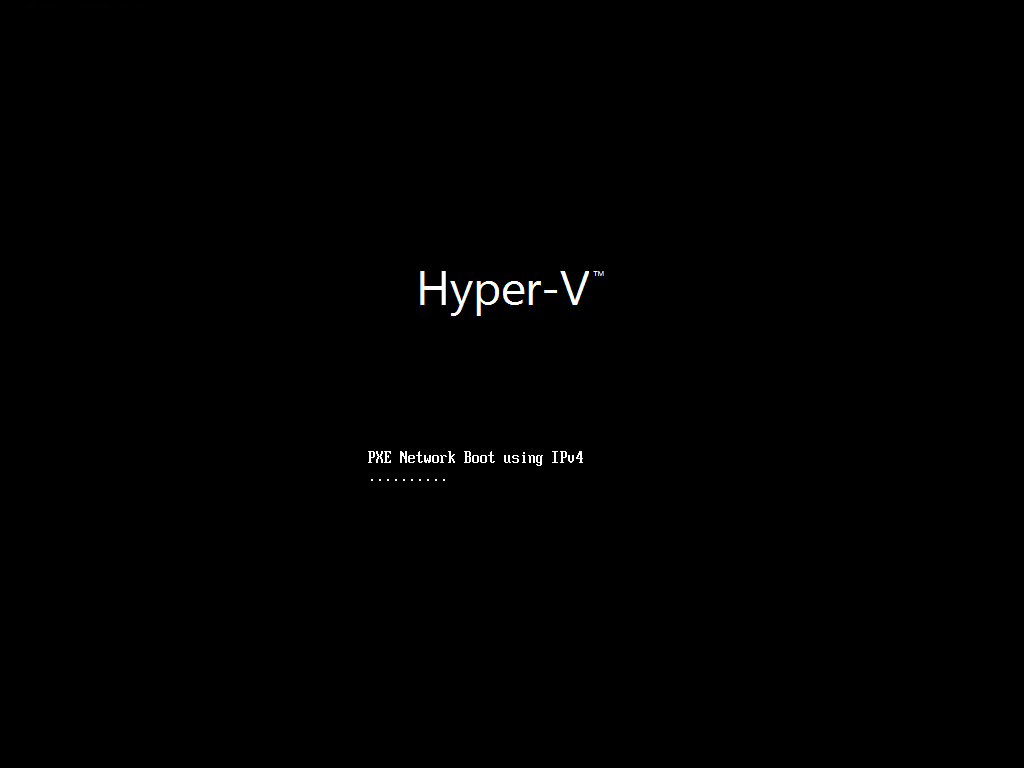
Now that we’ve created our task sequence and that it’s deployed. We can start the deployment on the machine. Make sure that your system is a member of your deployment collection and start the device. For this example, we will be using a virtual machine running on Hyper-V.

  • The machine is booting and waiting for the PXE to respond
SCCM Windows 10 Task Sequence

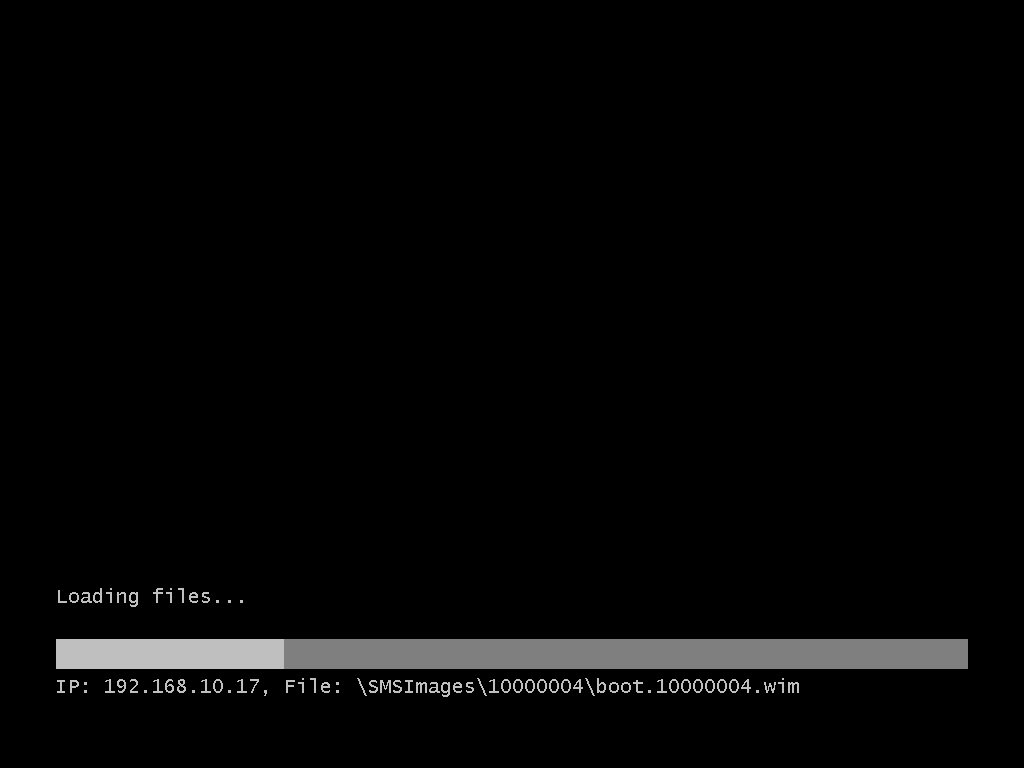
  • Our SCCM Distribution point is sending the boot image to our VM
SCCM Windows 10 Task Sequence

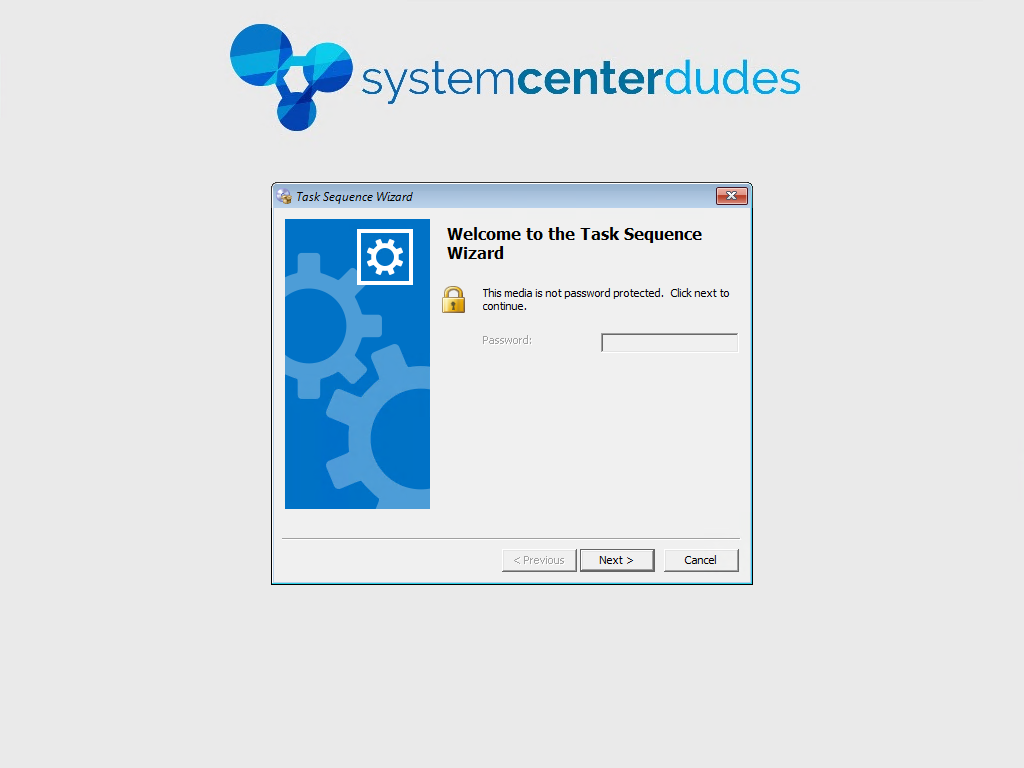
  • The Welcome to the Task Sequence Wizard pops-up. This is because of the Available purpose in the Deployment Settings. If we had a Required deployment, the task sequence would start right away. Click Next

SCCM Windows 10 Task Sequence

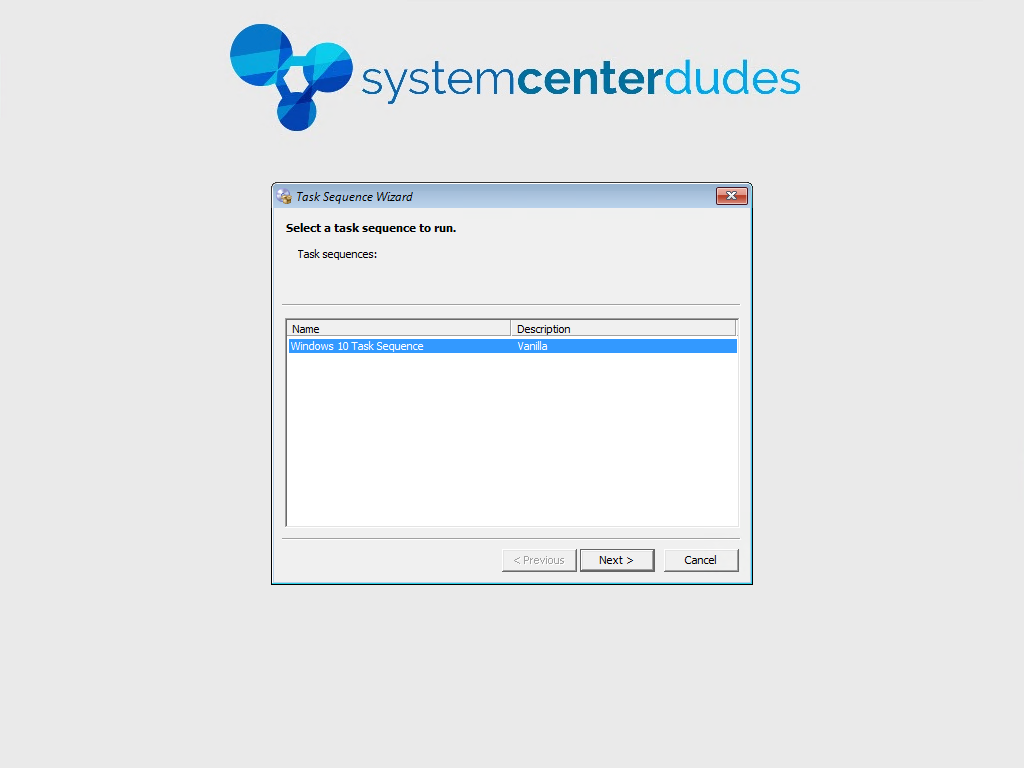
  • All the available task sequence are listed. In our example we have only 1 deployment on our collection so only 1 task sequence is available. Select the task sequence and click Next
SCCM Windows 10 Task Sequence

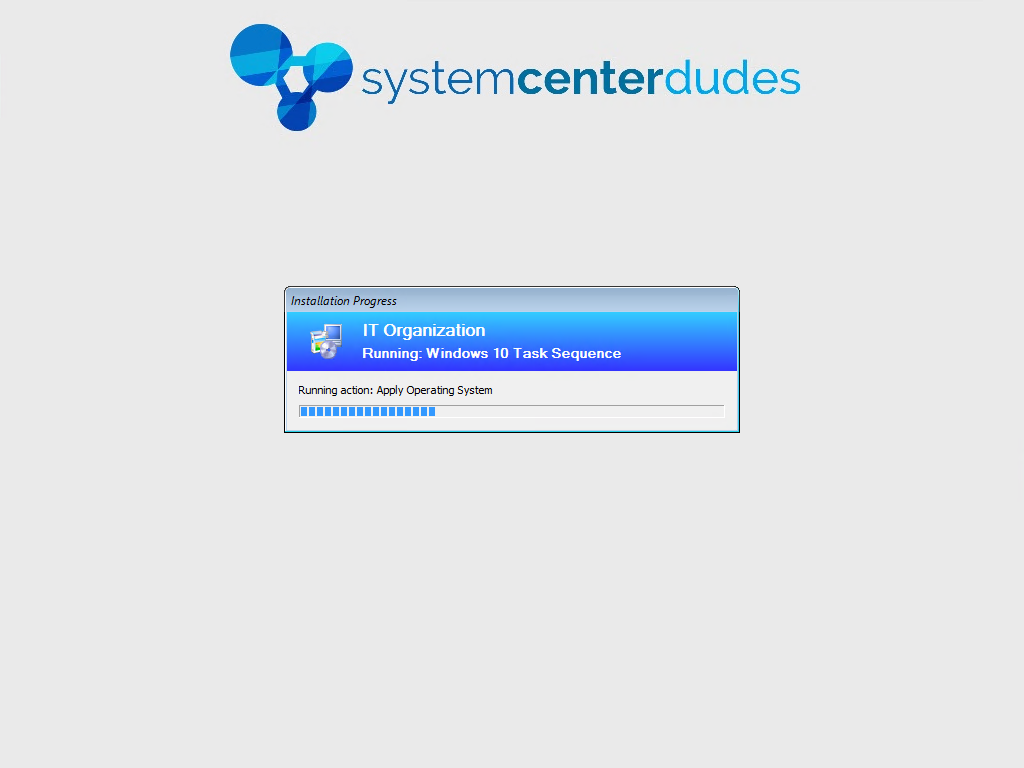
  • The Task Sequence starts

SCCM Windows 10 Task Sequence

Monitoring

See our blog post on this topic which covers the various ways to monitor your Task Sequence progress.

Comments (12)

lai290498

01.05.2024 AT 01:43 AM
Wonderful Article! - tstoto

Dave

03.22.2020 AT 09:05 PM
Win 10 OS’s deployed using SCCM 1910 don’t join to AD I have created a Task Sequence within SCCM v. 1910 to deploy Windows 10 operating systems. This task sequence also includes the domain name and Server 2016 domain administrator account to join the operating systems to the Active Directory domain. I have tested that the password I have entered for the domain administrator account is correct by clicking the Test connection button. I then get a message that says “The connection was successfully verified.” However, one thing I have noticed is that after I have tested the connection when I go back into the account setting and test the connection again (using the password that has been previously saved, I get a message that says “The user name or password is incorrect.” So it appears that the domain administrator password might not be successfully saved. The Windows 10 operating systems successfully install on the client computers using this task sequence. The problem is that once the Windows 10 operating systems have installed I am then unable to logon to them using either a domain account or local user account. What do I need to do to fix this so that I will be able to logon to these Windows 10 operating systems using either a local or domain user account once they have been loaded using this SCCM version 1910 task sequence? I need to ensure that the Windows 10 operating systems deployed using this task sequence will either: 1. Successfully attach to the Active Directory domain so I can the logon to them with a domain account or 2. Create a local account on the Windows 10 OS so I can then logon with this local logon account and join the computer to the domain

Robert

12.26.2019 AT 05:35 AM
Wendys french fries deal is back, now you can choose any size of fries only for $1. But this offer is only applicable to customers who take Wendys survey. So, hurry and take the Wendys survey at https://talktowendys.onl to get the offer.

Jackson

05.07.2019 AT 10:11 AM
I followed this exactly as it is laid out, but I only get the grey SCCM screen on PXE, boot and it never loads the Task Wizard. I checked the schedule, and it's allowed, it is applied to all unknown computers, and distributed to the distro point. Any suggestions?

RichardB

12.15.2018 AT 12:21 AM
I have just successfully deployed windows 10 (1803-1809). We just upgraded our sccm console to version 1806. Prior to that we were on 2012 R2, which was using the old windows 7 boot image. Once we updated our console and used the correct boot images we were running into all sorts of task sequence errors. The way I image our device is using a bootable media. Since we primarily image in our devices in our tech room, it gives me the control and less errors. I created one master image which was from a surface pro 4 which comprised of just windows 10 1809 (no updates, no drivers. Just Office 365 and a few apps) so far not issues. I have successfully deployed it to Surface Pro 4, Pro and Surface notebook 2. I am testing it on Lenovo Miix 510-520. I too cannot get the client to install with the task sequence but also cannot get my applications to install as well. we have a batch file that installs them but want to get this working seamlessly. the one thing i cannot do is re-image a windows 7 laptop to this build, i believe i know why but still testing.

Pedro Roeseler

06.26.2017 AT 09:41 AM
Hello. Thank you for the amazing Post! I'm trying to deploy and capture an image of Windows 10 x64 but without success. Error message: Task Sequence: Windows 10 Clean Installation has failed with the error code 0x80220014 In the smsts.log, the only error messages I see are: Getting namespace "Microsoft-Windows-Deployment" for architecture "amd64" pengine -> getnamespace ( spsettingsIdentity, readwriteaccess, NULL, &spnamespace), hresult=80220014 (e:\nts_sccm_release\sms\framework\osdcore\smiinterface.cpp,234 Failed to get namespace "Microsoft-Windows-Deployment" 0x80220014 Configure(), hresult=80220014 (e:\nts_sccm_release\sms\client\osdeployment\applyos\installimage.cpp,2072) could not find CCM install folder. Don't use ccmerrors.dll installation of image 1 in package PT10004A failed to complete.. unknown error (error: 80220014, source:unknown) I searched the Internet for similar threads but only found articles related with ADK 1511, which shouldn't apply to my case because I have the latest version installed. Properties on the adksetup.exe file indicates version 10.1.15063.0. Any ideas? Thanks in advance! Cheers!

Starling

03.29.2017 AT 12:07 PM
Hi I am trying to Deploy MBAM 2.5 policy, but I cant download the MBAM 2.5 SP1 Group policy templates, from the link that microsoft had to download, the link isn't working, can someone else please help me with that? This is the link that I used to download. Link: http://www.microsoft.com/en-us/download/details.aspx?id=41183 I am following this steps: How to Install MBAM 2.5 SP1 and integrate with SCCM Configmgr 2012 R2 SP1 – Part 5 to finish the configuration of MBAM 2.5 SP1 integration with SCCM 2012 R2 SP1. At the same time, I don't know, why I have problem with to get a report from windows 10 Laptops, but from Windows 8.1 is wroking. Thanks,

Jonathan Lefebvre

03.29.2017 AT 12:33 PM
Hi, Microsoft as released an update to ADMX for MBAM two days ago! You can use this link : https://www.microsoft.com/en-us/download/details.aspx?id=54957&WT.mc_id=rss_alldownloads_all Not sure for the other points about MBAM. Sorry about that Jonathan

Starling

03.29.2017 AT 05:17 PM
Thank you so much!

Richard

10.27.2016 AT 01:26 PM
I have a legacy WDS server used for deploying Windows 7. I am just testing Windows 10 deployments so I don't have PXE enabled on my SCCM server. Can I choose Make available to the following and choose Only Configuration Manager Clients? It should only pop up on the clients in that collection correct? I definitely don't want it to go to all clients, but I don't think PXE will work if I already have an old WDS still up and running.